More and more private homeowners are opting for sliding gates. Manufacturing them can be quite costly, so many decide to build sliding gates themselves. This will also require certain expenses, as you’ll need to buy materials and get acquainted with the necessary tools. However, in the end, you’ll have excellent high-quality gates at an affordable price.
Keep in mind that even DIY work will be more expensive than other types of gates, but the quality, durability, and convenience are excellent incentives to choose them. To make sliding gates yourself, drawings and diagrams will be very useful. You can use ready-made diagrams that you’ll find in this guide.
How to make sliding gates yourself? First, you need to understand the materials.
DIY Sliding Gates. Choosing Materials
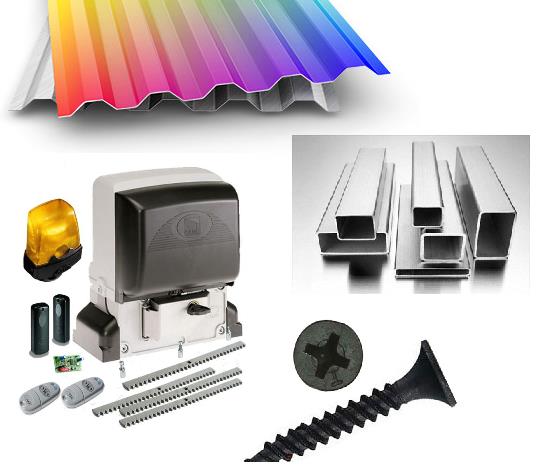
You will need painted profiled sheeting, rectangular pipes of various sizes, hardware, primer, screws, and automation. The most expensive items on this list are the hardware, which you can buy as a set, and the automation, which includes a drive with a control unit, a track, and remotes. If desired, you can also think about safety measures.
So, you need to select an adequate amount of materials. To begin, you will need a drawing and information about the dimensions to avoid overpaying for unnecessary items. For example, if the gates are 3×2 meters, you’ll need 6 square meters of profiled sheeting and a certain amount of kilograms of pipes.
Once you have the dimensions and have confirmed that this drawing suits your needs, you can start buying the materials. You can use the diagrams provided in this guide; proven schematics will save you any inconvenience. Next, make sure you have the necessary tools available for building sliding gates yourself.
Preparing the Tools
Prepare or borrow from acquaintances the following tools: an angle grinder, a grinder, a concrete mixer, bricklaying tools, a screwdriver, a ladder, shovels, a hammer, a level, wrenches, a crowbar, and a tape measure.
The list is quite extensive, and if you don’t have a specific tool, there’s no need to rush into buying it right away. Perhaps your friends have it, or you can rent it. Buying all this equipment for the installation of sliding gates yourself is unlikely to save you money in the long run.

Once everything is ready, it’s time to start the actual work.
DIY Sliding Gates. Installation
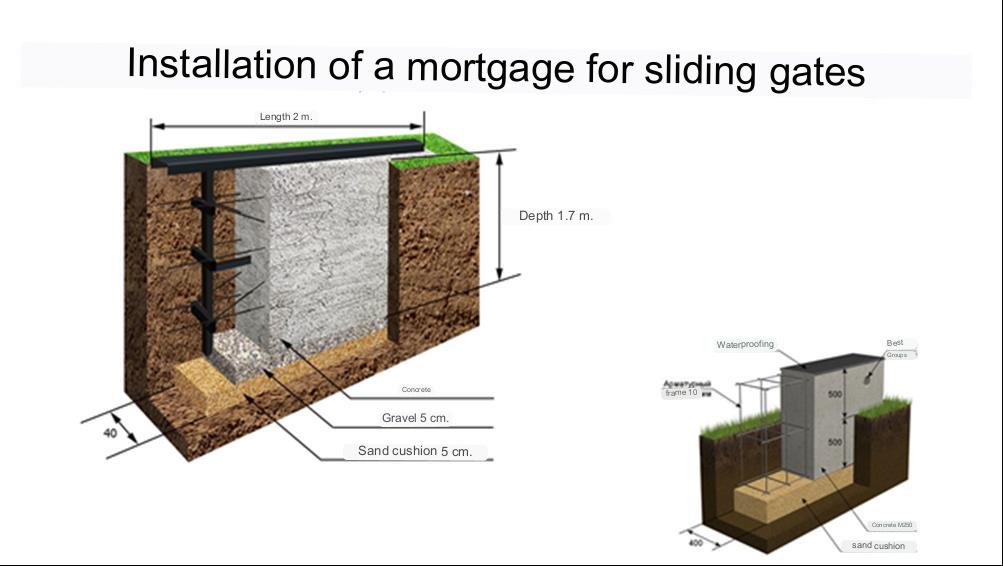
Preparing the Ground – an Important Stage
To begin, carry out preliminary work. Remove the topsoil layer if there’s any other surface covering in that area; you’ll still need to get rid of it. Mark out the future sliding gate area for convenience.
Next, during the layout, you’ll need to use four reinforcing elements, each 1 meter long, and electrodes – permanent and temporary axes. Before driving in the reinforcement, make sure that the diagonals of the rectangle coincide. Then drive them in, leaving 20 centimeters above the surface. Place a cord between the reinforcements. Temporary axes can be created from the main axes.
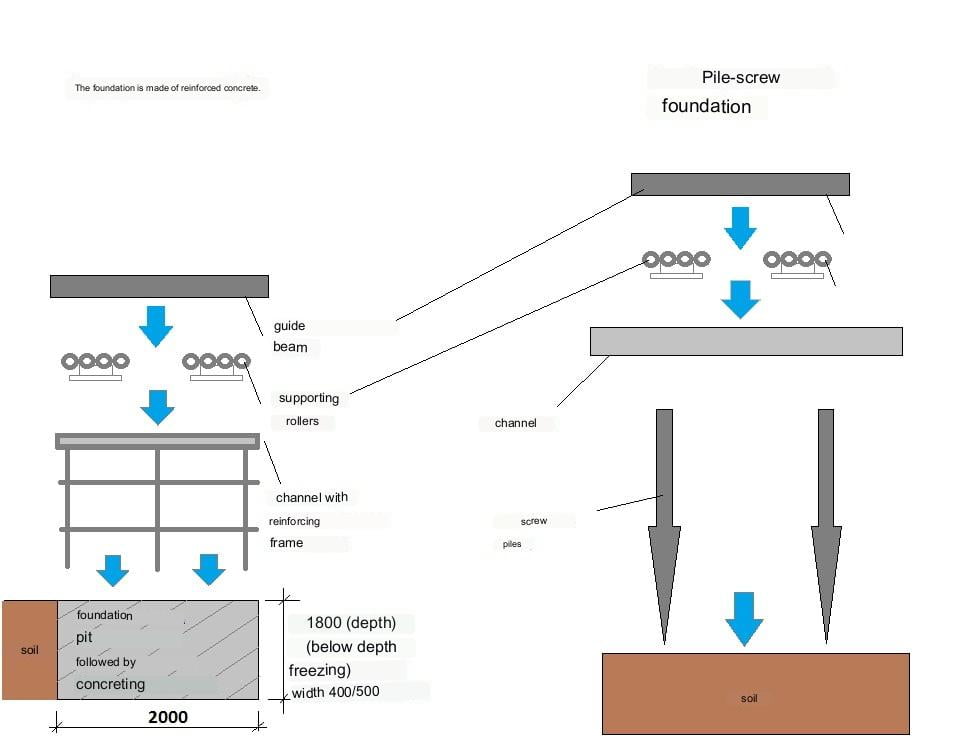
Next, you’ll need to dig trenches where the foundation for the gate posts, anchor elements, and wiring will go.

Tip: Don’t forget that the hole for the post must be slightly wider than its size. For example, if the post is 40×40 cm, the hole should be at least 42×42 cm. A wider foundation will make it easier to lay the bricks.
The anchor element also requires certain conditions from the foundation. The pit must be half the size of the gate opening.
Tip: Consider the climate of your area when creating the pits. The depth should be greater than the frost line. If the foundation is too close to the surface, the frozen ground may push it out, making the structure unreliable. Sometimes the depth can be almost one and a half meters, so don’t underestimate it at this stage.
When the walls start collapsing while digging the hole, you’ll need formwork. In this case, you can save by using old materials; boards will be covered with soil anyway.
After creating the pits, wet them to achieve compaction. If further work will be done later, make sure to cover them to protect against rain, which can wash them away.
To avoid damaging the driveway later, dig a trench in advance where the sleeve with the electrical cable will be laid for easy and quick connection of the sliding gate automation. For this work, you’ll need a regular plastic water pipe, with a diameter of about 20 mm. When the sleeve is laid and filled, also pour water over the area where the installation took place to compact the soil.
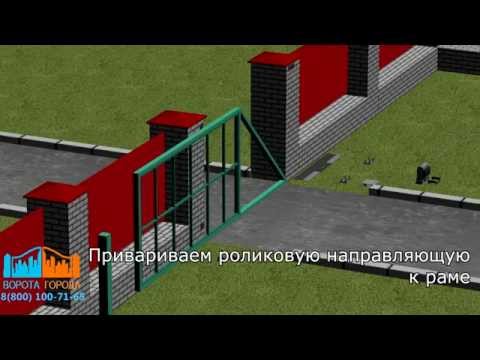
While the sliding gate sketch has been used sparingly so far, it will come in very handy in the future.
Preparing the pillars
Metallic elements, in this case, pipes, will serve as the core. It’s better to use rectangular items with dimensions of 80×80 mm or 100×100 mm. Round metallic pipes with a diameter of at least 80 mm will also suffice.
The top part of the pipe (above the ground) should be slightly shorter than the post, around a couple of centimeters. For example, if the post is 2.5 meters high, the core should be 2.45 meters. The part below the ground should not reach the bottom of the pit, leaving about 5 cm. So, if the pit is 90 cm deep, the bottom part of the pipe should be 85 cm.
Tip: To achieve maximum core strength and ensure the sliding gate structure is sturdy, you can create a kind of reinforcement by welding two reinforcing elements in a cross shape at the bottom. The length of the welded parts should be 25 cm.
Once the pipe is installed in the pit, protect it from moisture by covering it with something.
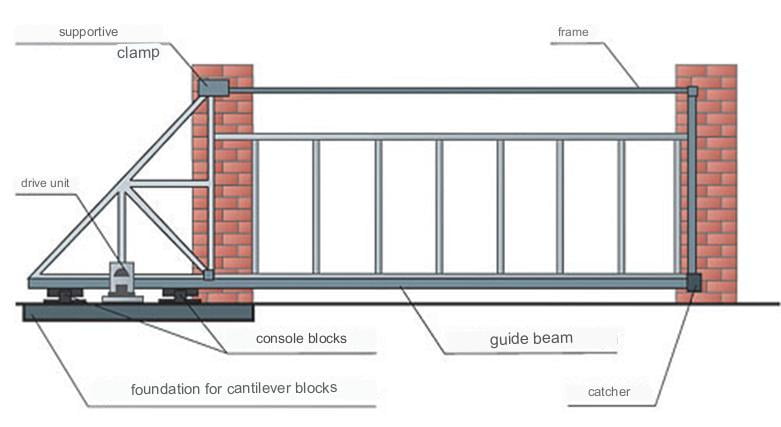
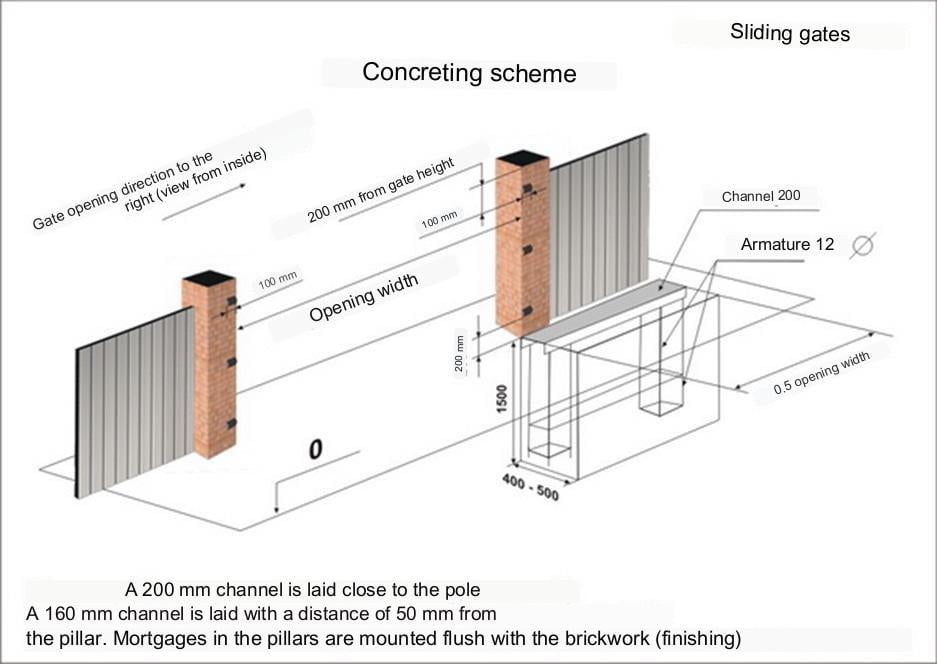
DIY Sliding Gates: Creating the Anchor Element
The quality of this element will affect your overall work because the anchor element influences gate movement and automation.
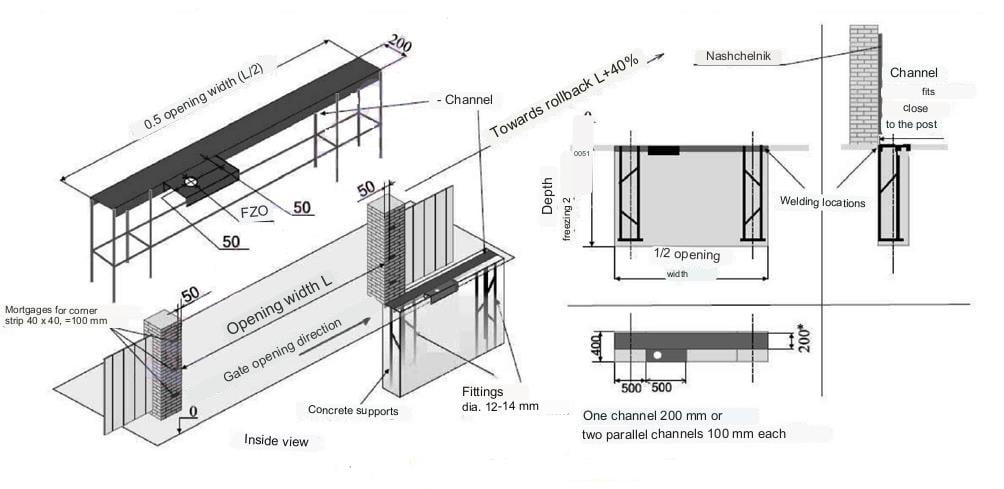
For this element, a steel channel beam is suitable, with a width of about 20 cm, but no less than 16 cm. The length should correspond to half the width of the gate opening.
To ensure that the channel beam is securely and durably held in the concrete, you’ll need to weld reinforcing bars to it. Again, you’ll need a welding machine. For this job, choose 4 pieces of reinforcing bar, each about 90 cm long. Weld them on both sides and connect them with reinforcing ties, selecting a diameter of 10 mm.
Pouring the Foundation for Sliding Gates
The preparation of metal items is generally complete, and you can move on to the next stage. It’s time to pour the foundation for the sliding gates yourself. Typically, it’s better to use concrete with a grade of M200. Prepare the mix: 1 bucket of cement, 3 buckets of sand, 5 buckets of gravel (fraction 5-20 or 20-40). Considering the total volume of the mix, use 20% water.
Wait for the temperature to normalize because in freezing weather, you’ll need to use additional anti-freeze additives. If the outdoor temperature is normal, you can start the concrete pouring process.
Before pouring the concrete for the foundation of the sliding gates yourself, double-check that all metal structures in the pits have not shifted and are securely in place. Under the weight of concrete, they can move, so make sure it hasn’t happened. Use a level to check how level the installation is, both horizontally and vertically.
The channel beam should be level with the surface horizontally, and if the driveway isn’t ready, calculate the distance from the top. Ideally, there should be 7 cm between the gate leaf and the surface to prevent snow from getting stuck when the gates move.
Tip: To ensure a sturdy sliding gate structure, do not forget to tamp the concrete continuously after pouring each batch of mix to avoid voids.
Once the concrete pouring is complete, you can proceed with leveling to remove all irregularities. If it’s very hot outside, protect the concrete from cracks by covering it. Water it a couple of times a day while it gains strength.
While the concrete is curing, you can take a week off. This is a strong recommendation if you aim for reliable and sturdy gates.
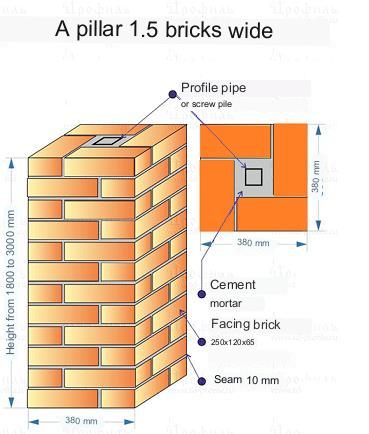
Brickwork for Sliding Gate Pillars
After completing the foundations and allowing them to become strong, you can start laying bricks, installing anchor elements for the sliding gate pillars. Use a 50×50 mm angle bracket, the length of which is about 8 cm, and an 8mm diameter reinforcing bar that is half the length of the pillar. Weld it to the core.
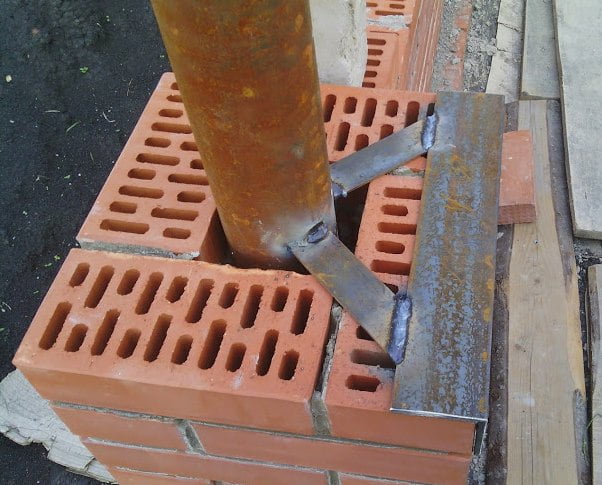
The pillars will require three anchor elements: one at the bottom after laying 3 rows of bricks, the middle one in the middle, and one at the top. When placing the top one, make it slightly below the future upper edge of the gate.
Creating the Frame for Sliding Gates
To make it more convenient to create the frame, use rectangular or square-section pipes. You’ll still need to use drawings and diagrams to create your sliding gates. A detailed drawing, which was mentioned earlier, will be very important now. If you have a sketch of the sliding gates, you won’t encounter any problems. It also helps save materials, using only what’s required for making the sliding gates.
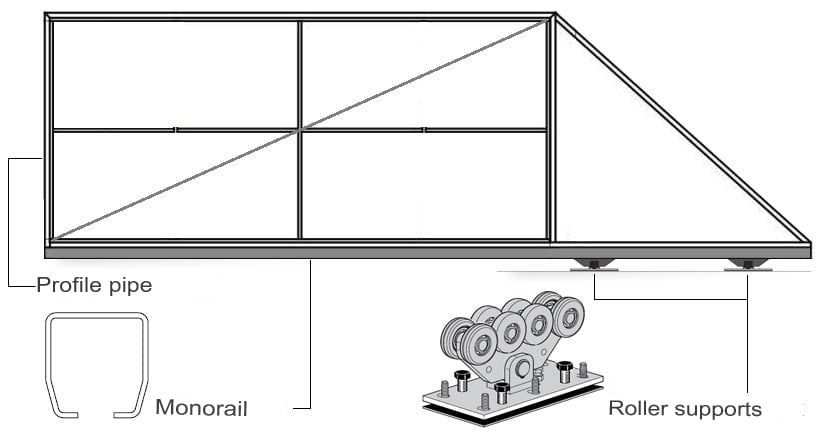
Clean all metal pipes and other elements from rust, degrease them, and apply primer. In the standard design for the gate leaves and load-bearing elements, a 60×40 mm or 60×30 mm pipe is used. The second inner frame is made from 30×20 mm pipes.
The assembly starts with the guide rail, so it should be prepared in advance. Ensure the stability of the frame in a vertical position during assembly; weld two square pipe sections as supports.
In the load-bearing frame, weld the bottom pipe to the rail with tack welds. Use a 15-20 mm length for the weld, spaced 600-700 mm apart, on both sides, in a staggered pattern.
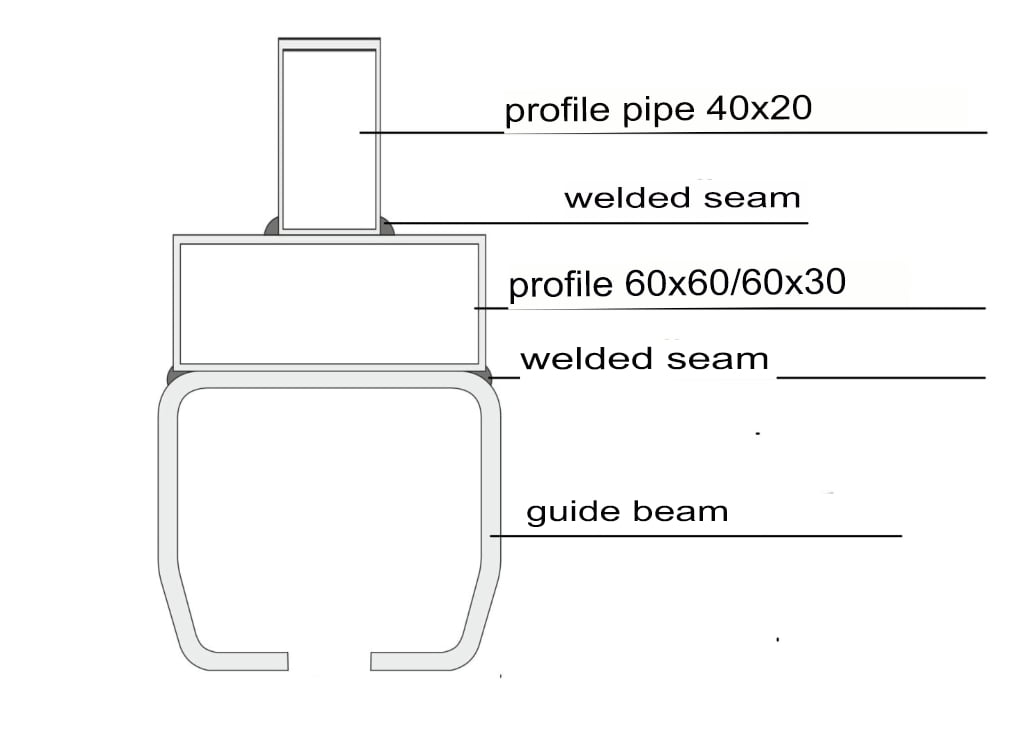
Tip: Avoid making a continuous seam. This is not only impractical and leads to unnecessary electrode consumption but also poses the risk of the guide profile warping, causing the gates to jam and making their operation difficult.
Afterward, you can begin positioning the vertical pipes, securing them with a single weld. Use a level to check the resulting vertical alignment, and only proceed with a continuous weld when you are sure that everything is in order.
Next, install and weld the top crossbar, followed by the diagonal one.
You can consider the load-bearing frame complete.
Next, around the perimeter on the inside, you should weld the pipes of the secondary frame, not the primary one. Later, corrugated sheeting will be welded to them. These pipes must be centered within the load-bearing frame so that the flooring, when it’s in place, is slightly recessed.
Welding work is finished; you can now grind the seams with an angle grinder, prime them, and paint them.
Tip: It’s better to apply paint in three coats.
To secure the profiled sheeting, use 19mm self-tapping screws designed for metal, making it easier to attach them when the leaf is already installed in the opening on the support. Each sheet should be adjusted individually to fit snugly against the frame. Leave a part of the leaf with a triangular shape without attaching profiled sheets since this part won’t fit into the opening anyway.
That covers the leaf, but there are other equally important details remaining.
There’s very little left to complete the DIY sliding gates.
Guides are created from 60×30 or 60×40 mm metal pipes and are installed.
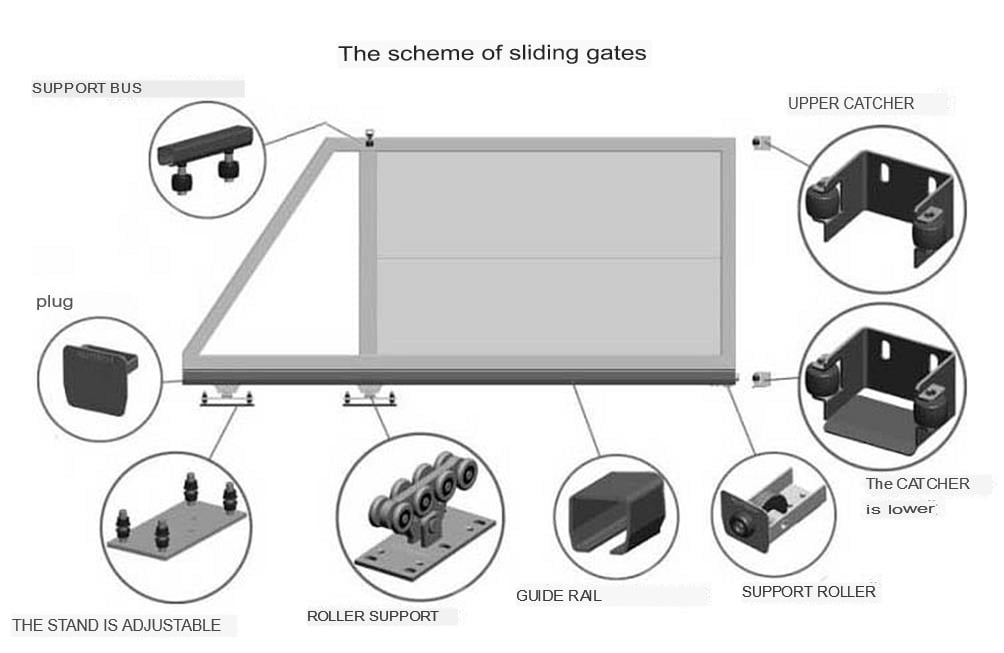
To create DIY sliding gates, select the hardware:
- Guide rail – choose a high-quality profile with a smooth surface, free of defects, and not rough. The metal should be specific, with a higher carbon content than usual.
- Roller carriages – opt for ones with metal rollers; avoid polymer ones. Bearings with metal-rubber dust seals. Smooth movement is essential. Ensure corrosion protection.
- Upper plate with rollers, there should be 2 or 4 of them. It’s better to choose ones with rubber coating to prevent scratching the panel.
- Lower end roller – either polymer or metal will do.
- Lower and upper stops.
- Rubber plugs, preferably with corrugated parts.
- Mounting plates for roller supports.
Assembling sliding gates yourself won’t pose much difficulty. All that’s left is to install the mentioned elements and set up the automation. The construction of sliding gates may seem complex, but you can handle it on your own without paid external assistance, using our instructions and watching the video guide below.