The technology of constructing quickly erectable buildings is gaining significant popularity. This topic is constantly discussed on construction forums and sparks numerous debates. The pros and cons of frame houses will help form a general understanding of the method and familiarize you with the stages of construction.

Pros and Cons of Frame Houses
Based on the experience of European countries, there is no doubt that frame-panel houses will soon become leaders in low-rise construction. Compared to traditional construction systems, this technology has its advantages, the main one being cost-effectiveness. The financial aspect is one of the motivating factors for acquiring your own housing. The cost per square meter is 1.5 times lower than that of aerated concrete blocks, 2.4 times lower than brick walls, and 1.4 times lower than timber.
A frame-panel structure can be assembled by a team of 4 people in 1.5 months. According to this principle, it is permissible to construct objects of any complexity up to 3 floors. Moreover, building a frame house by yourself will allow you to save on the foundation, equipment, and a team of workers.
Among the disadvantages are:
- Absorption of moisture.
- Fire risk.
- Poor ventilation.
- Sensitivity to vibrations.
- Short lifespan.
There is a mistaken belief that only brick, panel, or wooden walls provide good insulation. However, according to current thermal insulation standards, modern constructions in some regions do not meet the standard requirements. Canadian homes with 150mm walls have the same thermal insulation coefficient as a double block masonry and are perfectly suitable for living. In cold weather, when heating is turned off, the rooms maintain a normal temperature for an extended period.
The thickness of the frame house is determined by whether it will be used for temporary or permanent residence. If the dwelling is planned for seasonal use, there is no need to invest in expensive insulation. Consequently, the wall thickness will be slightly less, and for a comfortable microclimate, a 10-15 cm underlay will suffice. If it’s intended for permanent residence, a thicker layer is applied—more than 15 cm. Ultimately, the wall ends up being 20 cm thick, not accounting for the external and internal cladding.
How to Properly Calculate the Thickness of a Frame House
For this purpose, there is a special table with indicators for each region. The formula incorporates:
- Insulation thickness parameters;
- Thermal conductivity coefficient of the material;
- Calculation of the parameter.
When ordering a house kit from the factory, calculations are done on-site, and customers are offered plates with an added strength margin. Many believe that if these plates are thick, there’s no need for insulation. However, this is a misconception – without quality insulation, heating costs increase significantly. The walls of a frame construction should resemble a layered cake. Thanks to the air cushion between them, even in freezing temperatures, the house retains warmth.
Frame houses are built using Finnish or Canadian technologies. The process algorithm is the same and consists of several stages:
- Materials purchase.
- Foundation pouring.
- Bottom framing of the foundation.
- Construction of walls and the roof.
- Installation of windows and doors.
- Wall cladding and insulation.
- Interior finishing.
To prevent heat loss and ensure proper ventilation, it is essential to adhere to the adapted technology during the construction of the structure.
How to Build a Frame House: Foundation Pouring
A quick-to-construct structure is lightweight, so there’s no need to build a robust foundation. Depending on the soil type and the number of floors in the building, you can choose between:
- Screw piles;
- Pillar-based;
- Strip foundations.
When choosing the foundation type, you need to calculate the total load. One running meter with a height of 3 meters weighs about 1.7 tons. If you plan a single-story building, multiply the perimeter by 1.7. For a two-story structure, multiply the area by 2 and then by the weight of 1 running meter.
One popular option is screw pile foundations. These are suitable for building foundations in marshy areas, places with complex terrain, except for rocky ground. For a family of 3-4 people, pillar-based foundations are suitable. Holes are drilled to a depth of 80 cm and a width of 20 cm using a drill, and asbestos-cement pipes are inserted at a distance of 90 cm. The free space is filled with a mixture of sand and gravel, and after compaction, it is poured with a cement mixture. This is how 130-150 pillars are installed.
Monolithic Foundation
A strip foundation for a frame house has become a classic choice. It consists of a concrete strip forming a closed contour. Compared to pillar-based foundations, it has a larger surface area, providing good load-bearing capacity. The step-by-step description of building a shallow foundation will allow you to do the work yourself. You will need:
- Reinforcing bars;
- Sand, gravel of various fractions;
- Steel wire;
- Cement;
- Waterproofing;
- Tools: saw, shovel, construction mixer.
After calculations, mark the location using stakes and a rope. To ensure the strip is even, stretch a second row of twine 10 cm wider than the thickness of the wall. Use a laser level to measure angles or check for evenness by comparing diagonals.
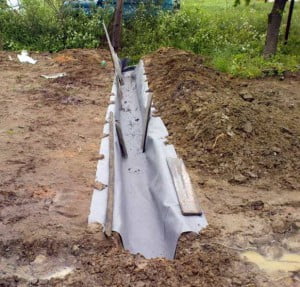
For a shallow foundation, deep digging of trenches is not required. Unlike the foundation, where pits are dug below the freezing level, it’s enough to remove the topsoil and dig trenches half a meter deep. In this case, the strip will rest on the ground. Even though the soil undergoes freezing expansion, the load-bearing capacity remains unaffected, especially if the house is built on sandy or gravelly soil.

Line the bottom with geotextile, and then layer by layer, add a sand cushion. Each layer should be moistened and compacted. On clayey soil, the underlayment height reaches 50 cm, while on sandy soil, it’s half that. Next, lay down waterproofing made of bituminous-polymeric materials.
Building Formwork and Pouring the Mixture
At this stage, formwork for concrete is assembled around the perimeter using slate, boards, or plywood. The height of the mixture pouring is measured from the inside with a level, and markings are made on the boards accordingly. A reinforcing frame is constructed along the formwork. Steel rods with a diameter of 10-16 mm and a ribbed surface ensure a strong bond with concrete and prevent future foundation damage. If the height of the formwork is more than 30 cm, the rods are laid in multiple rows.

The penultimate step in casting the monolith is the even distribution of concrete. After pouring the first layer, it is punctured to prevent vacuum voids. The second layer is added before the first one sets. The final layer is leveled according to the markings and sprinkled with dry cement through a sieve.
Unprotected shallow foundations conduct cold from freezing soil in winter. To retain warmth in the house, polyfoam insulation is placed on the outside. In regions with harsh climates, a different scheme is used, with an insulating layer added horizontally at the base.
If the temperature remains at +20°C, construction can continue after one week, as the concrete will have hardened by 50% during that time. If the temperature doesn’t rise above +17°C, it’s advisable to wait for 12 days. The monolith will require at least 28 days to fully dry.
Building a Frame House Yourself: Step-by-Step Guide
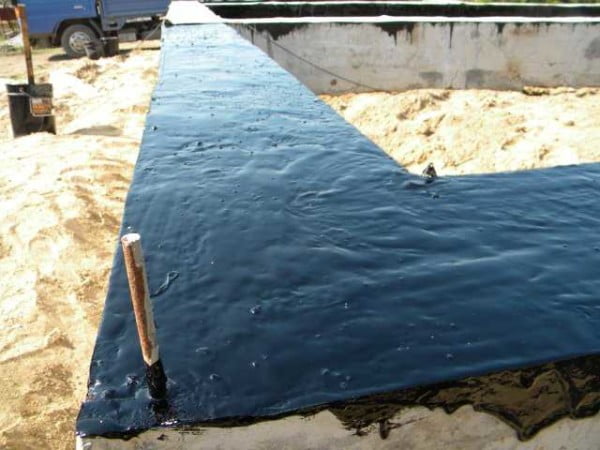
To prevent moisture absorption from the concrete, two protective layers of bituminous mastic are applied on top of the foundation. Other options include roofing felt or waterproofing. Many people distribute liquid waterproofing around the perimeter and attach rolled material to it.
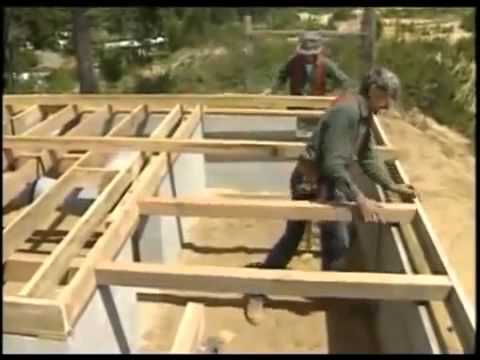
Bottom Foundation Band
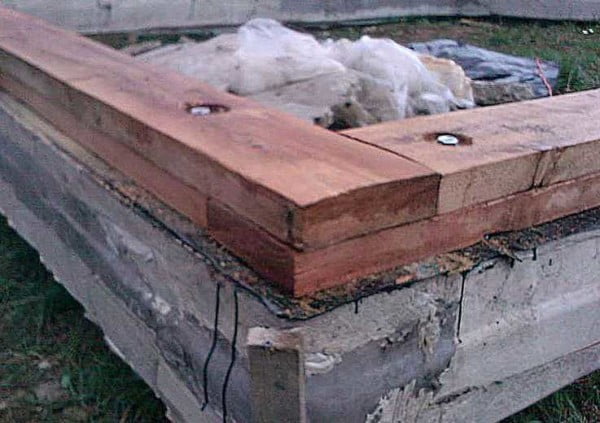
Framing refers to the installation of boards and their connection to the concrete foundation. Only after mounting the floor joists – dry softwood beams with a cross-section of 150 x 150 mm, treated with fire-resistant coatings and special impregnations – can you begin constructing the walls. To save on materials, many people opt for two thick boards joined together with nails spaced at 20 cm intervals.
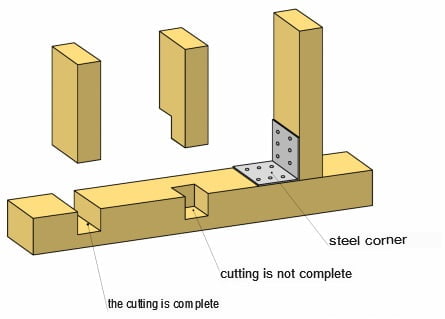
The process starts at the corners of the building, aligning the edges with the contour. Then, the next board is placed on top, overlapping the joint of the first row to create a lock. This is how it looks:
To connect it to the foundation, you use dowels. First, drill holes 100 mm deep and insert fasteners into them. Here are the fixation options:
- Anchor connections, pre-installed in the concrete;
- Wedge anchors;
- Driving nails into embedded wooden plugs.
At the finishing stage, joints are covered with jute tape. The boards are fastened together at the corners with brackets or braces. A framing board with the same cross-section is placed on the edge of the joist and secured with long nails at 40 cm intervals. Finally, angles and diagonals are checked again, and any misalignments with the beams are corrected with an electric planer.
How to Frame and Install Floor Joists
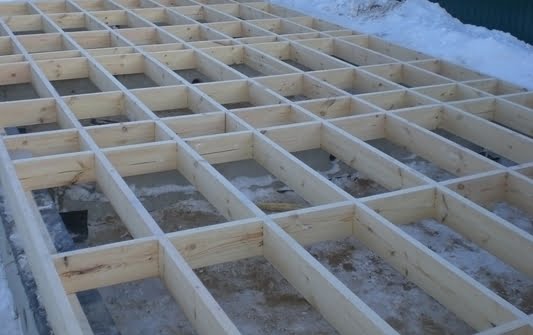
Next, cross joists are installed. Boards with a cross-section of 150 x 50 mm, turned on their sides, are fastened at a 40 cm spacing using diagonal nails 9 cm long, attaching them to the end and bottom beams on the left and right. If they are long, and a crossbeam is laid, 45 cm long crosspieces are placed on top.
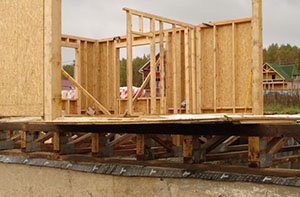
Floor Decking
After installing the framing, a waterproofing film is placed between the joists, followed by insulation. For a budget-friendly option, use expanded polystyrene with a density of 15 kg/m³ and a thickness of 150 mm. The insulation is cut with a saw and laid in two layers. To ensure that the edges of the second row of sheets do not align with the first row, the material is distributed in a staggered pattern. To secure the foam boards, a 50 x 50 mm batten is attached around the perimeter of the framing at the bottom, and the seams are filled with construction foam.
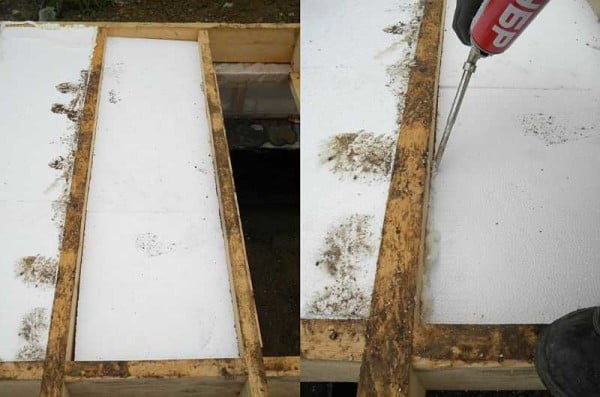
The material is covered with a vapor barrier membrane, and then the subfloor is constructed. For the subfloor, you can choose plywood, tongue-and-groove boards, or inexpensive OSB-3 panels. The sheets are laid across the framing. To ensure stability, the sheets are placed in a staggered or perpendicular pattern to the joists.
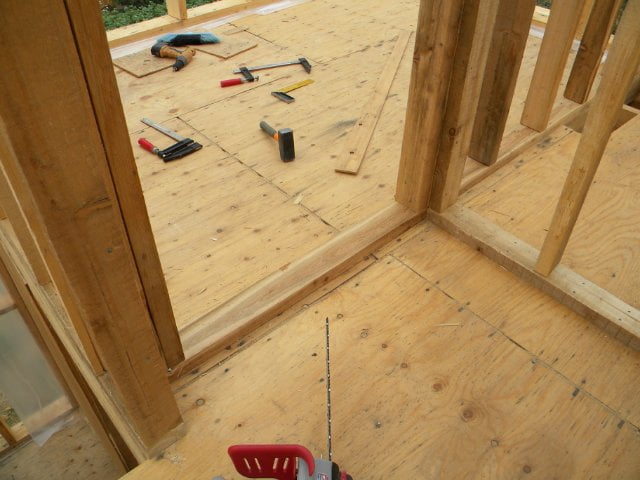
The subfloor is secured to the joists using 50 mm screws or ringed nails. First, adhesive is applied to the backside of the sheets, and then they are fastened every 15 cm along the edges and with a 30 cm spacing in the middle. Leave a 3 mm gap between segments on all sides.
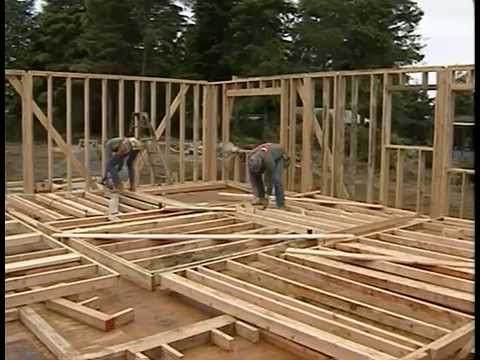
Now, to build the walls, you’ll need a frame, either wooden or steel. A popular choice is oak, larch, or other wood with a dense structure. Such constructions are one-third cheaper than their metal counterparts. Before installation, they are planed, treated with fire-resistant coatings, preservatives against decay, and protection against pests.
Installation of Vertical Posts
To build a frame house that will stand the test of time without requiring frequent repairs, it’s essential to follow the sequence of steps and consider all construction nuances. This primarily pertains to the fastening of components. When constructing the frame, start by installing the corner posts. If nails are used for the connection, leave a gap of up to 10 cm from the edges, create holes in the end of the post that are 1 cm longer than the nail, and vertically secure the timber.
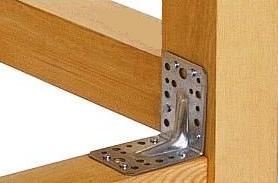
Next, choose the method for attaching intermediate longitudinal posts. The first method involves securing them to the framing with partial or full notching or connecting them with galvanized brackets. The second method is simpler and more reliable, though it may increase the project’s cost.
The installation principle for the upper beams is similar to that of the lower framing. Horizontal structures are joined at the corners with vertical posts and secured with two nails and brackets.
Building the Walls
When constructing a frame house, should you assemble the sections on the ground and then lift them into place or build them in situ? Typically, you attach the pre-assembled sections to the lower base. The first section is nailed to the floor and supported by braces, and the second section is connected to the post of the first one, continuing this process around the perimeter.
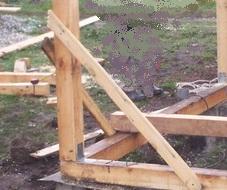
Regardless of the method used to connect the posts, they are reinforced with temporary braces. This strengthens the lower framing until permanent supports are installed, providing rigidity and resistance to wind loads. After the installation of all structures:
- The framework is checked for plumb and level;
- Temporary supports are removed;
- Two planks are attached to each support, one at the top and one at the bottom.
Windows and Doors
Door and window openings are installed according to the project’s specifications. First, posts are secured to the sides of the openings, followed by lintels at the top and bottom. Internal partitions are installed similarly to the frame and are reinforced with boards for added stability.
Ceiling
The ceiling installation process consists of several stages:
- Notches are cut into the beams.
- Transverse structures are inserted into the openings, nailed, and fastened with steel brackets.
- Supports are installed inside, connecting them with the upper and lower beams.
- A ceiling sheathing made of tongue-and-groove boards is laid.
- A vapor barrier layer is applied, followed by insulation and a waterproofing membrane.
- A rough floor is constructed.
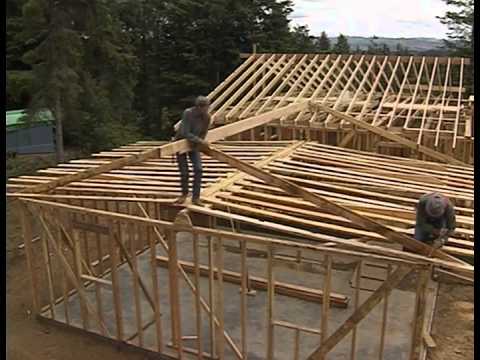
Roof
When it comes to constructing the roof of your frame house, you can choose from various options, including a mansard roof, multi-gabled roof, single-pitched roof, or multi-pitched roof with a slope of at least 10°. To calculate the rafters and the step lattice, you can use construction tables or construction calculators.
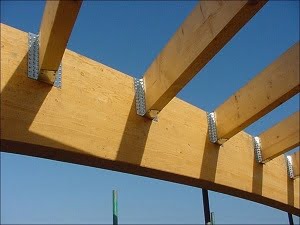
- Rafters are assembled from timber on the ground. To do this, two boards are joined together at the top at an angle and then lifted into place.
- First, pairs of rafters are installed at the gables with an overhang of 400-500 mm.
- The roof pitch is adjusted, and the structures are mounted to the upper framing.
- The remaining parts of the system are installed with a spacing of 700 mm.
- They are then integrated with a ridge beam, serving as support for the upper rafters, and secured into the floor.
- A continuous or spaced sheathing with a cross-section of 25 x 30 cm is built, and it is fastened to the rafters with side battens. The spacing of the battens is the same as that of the rafters.
A vapor barrier membrane is stapled to the inner side of the rafter legs, and the joints are sealed with tape. Insulation panels are placed between the rafters, followed by a vapor barrier membrane. Finally, the roofing material is installed. The process is visually presented in the image below:
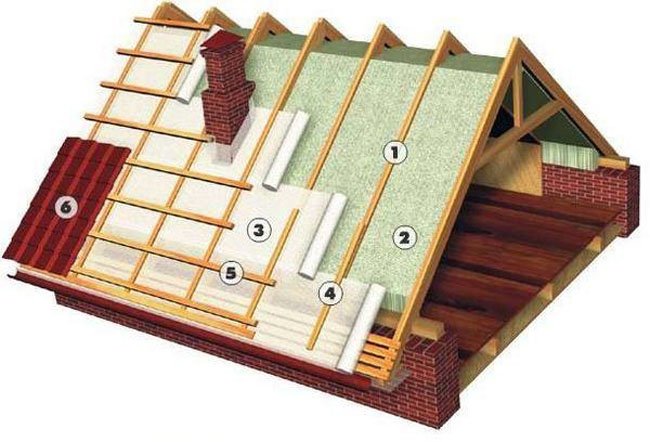
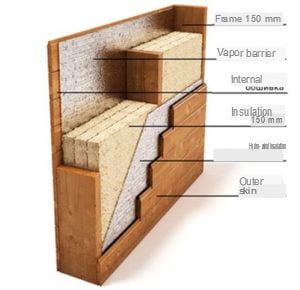
Wall Insulation
For wall insulation, you can choose a protective material with a thickness of 50 mm, such as expanded polystyrene, mineral wool, or foam.
- Place the insulation mats between the vertical posts of the frame. If using a double layer, make sure the joints of the sheets do not coincide. To protect against moisture, apply waterproofing on the exterior side.
- Then, install the lathing using thin slats that match the thickness of the insulation. This allows for air circulation.
- On the room side, stretch the vapor barrier and secure it with a stapler. Cover the walls with thick plywood, gypsum fiberboard sheets, or paneling. This creates the base for interior finishing with drywall.
- On the exterior, cover the walls with finishing materials like clapboard, siding, or Europanel.
With these steps completed, your house is ready for interior finishing, you can build a terrace and you can celebrate your new home. There are many nuances in building prefabricated frame-panel houses, and experience and knowledge will come with the process.
Full Video on How to Build a Frame House