How to Build a Brick Oven by Yourself – Introduction to Home Ovens, along with Detailed Instructions, Drawings, and Step-by-Step Descriptions, Plus Useful Tips.
Types of Home Ovens
Classification Based on Purpose
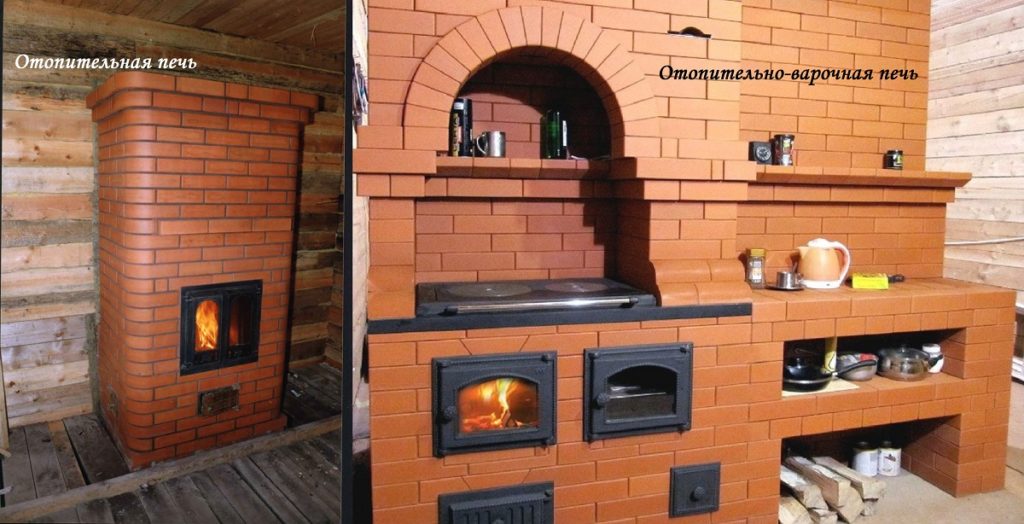
- Heating Ovens: These ovens are used solely for heating a room as either the primary or secondary source of heat. Heating ovens circulate and warm the air.
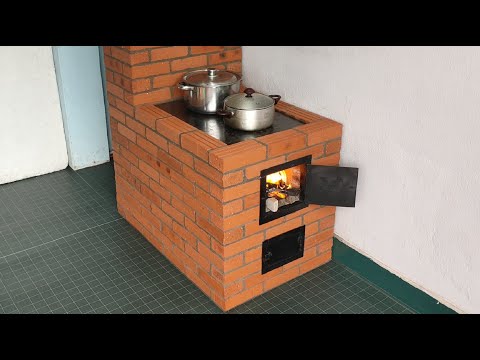
- Heating and Cooking Ovens: These ovens can be used for both heating a room and cooking instead of a stove.
Classification Based on Construction
Direct Flow Ovens
The principle of operation for such ovens is as follows: air moves into the combustion chamber, rises, bypasses the grate, and exits through the chimney.
Drawbacks of direct flow ovens:
- Low efficiency due to warm air escaping along with the cold air, which could otherwise be used to heat the room.
Advantages:
- Since these ovens are made of bricks, which retain heat well, they heat the room evenly and keep it warm.
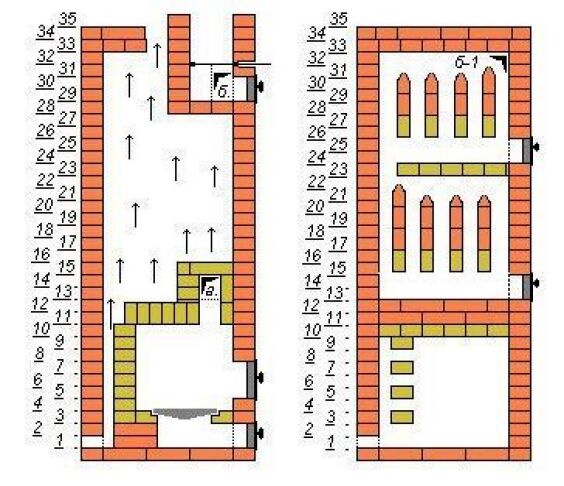
Channel Ovens
These ovens are an improved version of direct flow ovens. They have multiple channels, allowing warm air to circulate through them before exiting through the chimney. When installing channel ovens, it’s essential to consider the linear relationship between the useful action coefficient and the length and number of channels.
Hood Ovens
These ovens are designed to retain heat in the room. Warm air, following the laws of physics, rises and is held by the hood. As it cools down, the air becomes denser and descends. Since there’s no need for cold air, it exits through the damper.
Advantages of hood ovens:
- They provide even room heating due to their design.
- Soot can be easily removed since it accumulates in one place – under the hood.
Classification Based on Material
Brick Ovens
Advantages:
- Autonomy: Once fueled, the oven can operate without much attention for an extended period.
- Heat retention: Brick structures have low heat conductivity, so they retain heat for a long time.
Drawbacks:
- Slow heating time.
Cast Iron Ovens
Advantages:
- Easy installation, no need for a foundation.
- Non-flammable.
- Compact.
- Rapid heating.
- Wide variety of ovens in terms of appearance.
- No additional cladding required.
- Automatic cast iron ovens can regulate their temperature.
- High efficiency.
- Performance depends less on the amount of fuel used.
- Relatively low cost.
Drawbacks:
- Cool down fairly quickly and require additional reheating.
Preparatory Work, Necessary Materials, and Tools for the Job
How to build an oven by yourself? Let’s consider the preparation:
- Foundation: If the oven is large (more than 500 bricks), you’ll need an additional foundation. For a small oven, it’s not mandatory.
- Insulation is mandatory for all types of ovens, both large and small.
- Chimney: The chimney must not come into contact with ceiling beams. The distance between it and all beams should be approximately the same.
- Flue Pipe: The protrusion of the flue pipe must be at least half a meter above the roof but not more than one and a half meters.
- Oven Placement: Choose a location in consideration of the chimney and flue pipe, taking into account what will be above the oven.
If these points are taken into account, here are a few more tips:
- It’s better to position the oven to heat as many rooms as possible. For instance, if there are several adjacent rooms in the house, it’s best to place the oven not in one of them but in between so that it heats them all.
- If you need to heat just one room, it’s better to place the oven closer to the wall but not right up against it.
Tools and Materials
Materials:
- Clay (for making mortar for masonry).
- Sand.
- Bricks. Red refractory bricks. Chamotte bricks.
- Flue pipe.
- Gravel.
- Wood.
- Cement.
- Roofing felt.
- Grate grate.
- Corner steel.
- Roofing steel.
- Wire.
- Nails.
- Steam valve.
- Oven thermometer.
- Doors (for the cooking chamber, underfire, and ash pit).
- Cast iron stove tiles.
Tools:
- Oven hammer.
- Ruler.
- Knife.
- Shovel.
- Square.
- Plumb bob.
- Level.
Design and Blueprints
How to build an oven by yourself? There are main types of constructions:
Russian Stove
Advantages:
- Efficiency can reach 80 percent.
- Retains heat for a very long time, in some cases, up to two days.
- The firebox surrounds the fire on all sides, reducing the fire hazard of the structure.
Disadvantages:
- Large size.
- Heavy weight.
- Slow heating.
- Requires daily firing after a break.
- Has the most complex construction among all possible types of ovens.
A Russian stove is suitable as a permanent source of heat, completely replacing and even surpassing a stove. It can even serve as a bed, but such a stove has enormous dimensions, and its installation should be justified.
Dutch Stove
Belongs to the channel type.
Advantages:
- Simple masonry.
- Takes up relatively little space due to its elongated shape.
- Heats up quickly.
- Relatively lightweight.
- Allows for cooking.
- Does not require regular firing to maintain operability.
Disadvantages:
- Cools down quickly.
- Low efficiency.
It turns out that the Dutch stove is not suitable as the main source of heat and cannot heat a large room. However, such a stove is convenient for small rooms and irregular use.

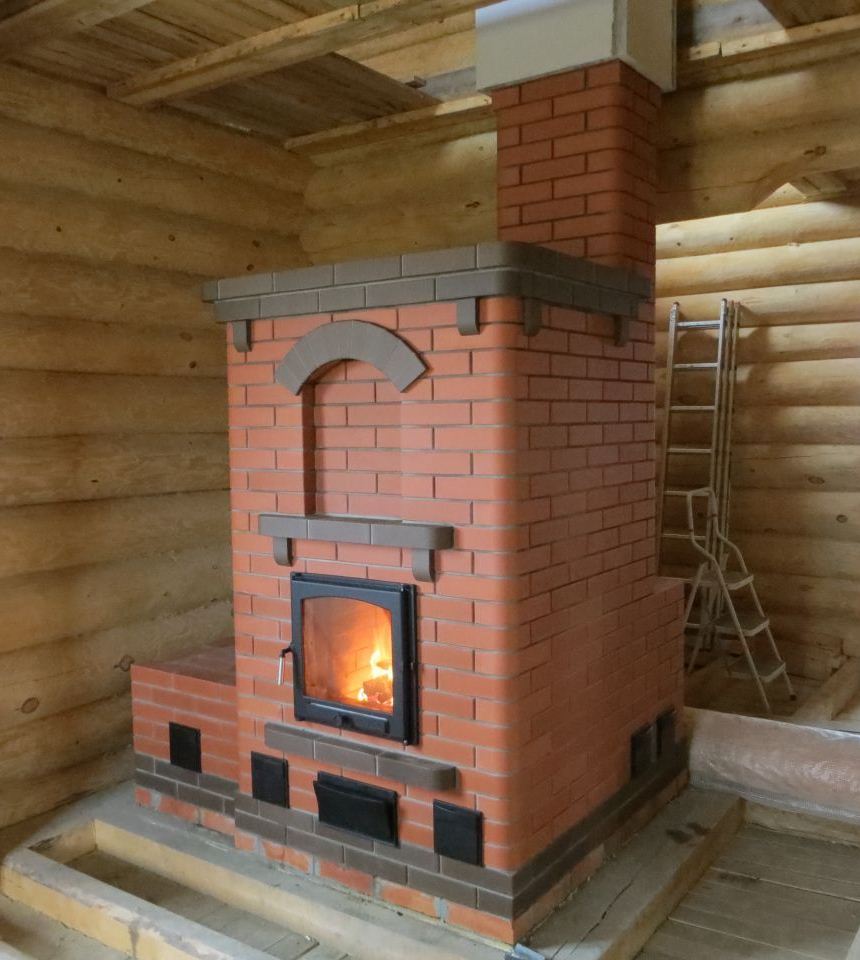
Standard Rectangular Stove
Advantages:
- Does not occupy much space.
- Simple construction.
- Low material and fuel costs.
Disadvantages:
- Moderate efficiency.
- Does not retain heat for a long time.
A standard rectangular stove is a middle-of-the-road option suitable for standard heating of a moderately sized room.
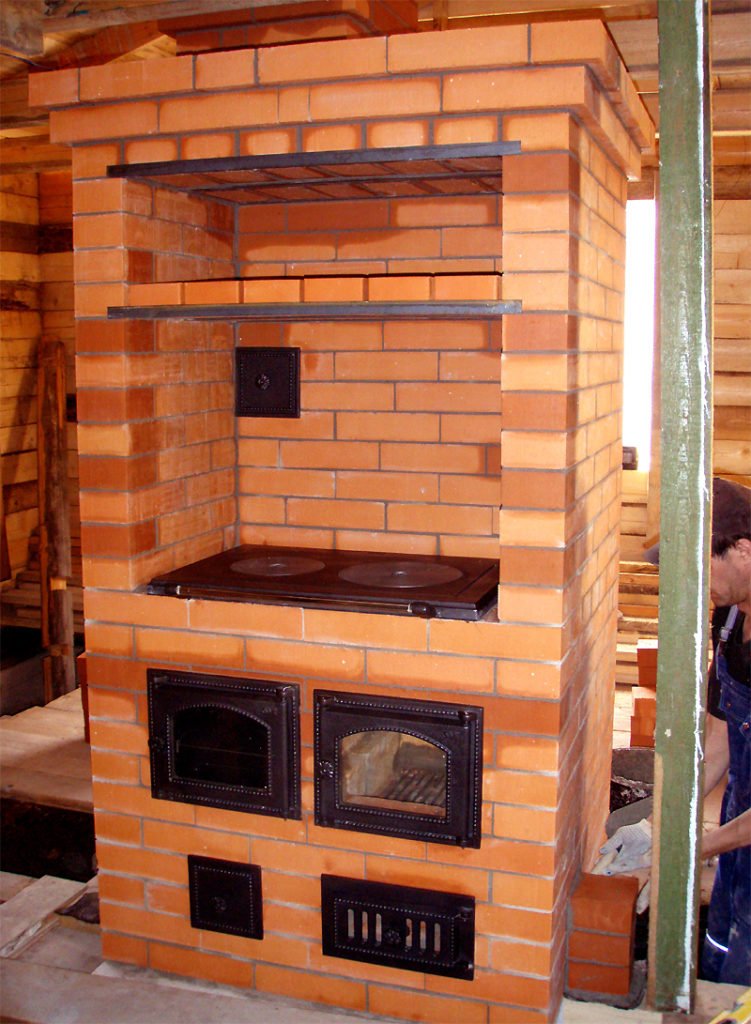
Swedish Stove
Belongs to the heating and cooking type.
Advantages:
- Allows for cooking.
- High efficiency.
- Quick heating.
- Conserves fuel.
- Relatively small size.
- Modern variations include an oven, cooking panel, and space for drying clothes.
Disadvantages:
- Requires a warming-up period.
- Has a complex masonry for beginners.
A Swedish stove is suitable as the primary source of heat in a room, can fully replace a stove, and comes in various construction options. However, it can be challenging to assemble.
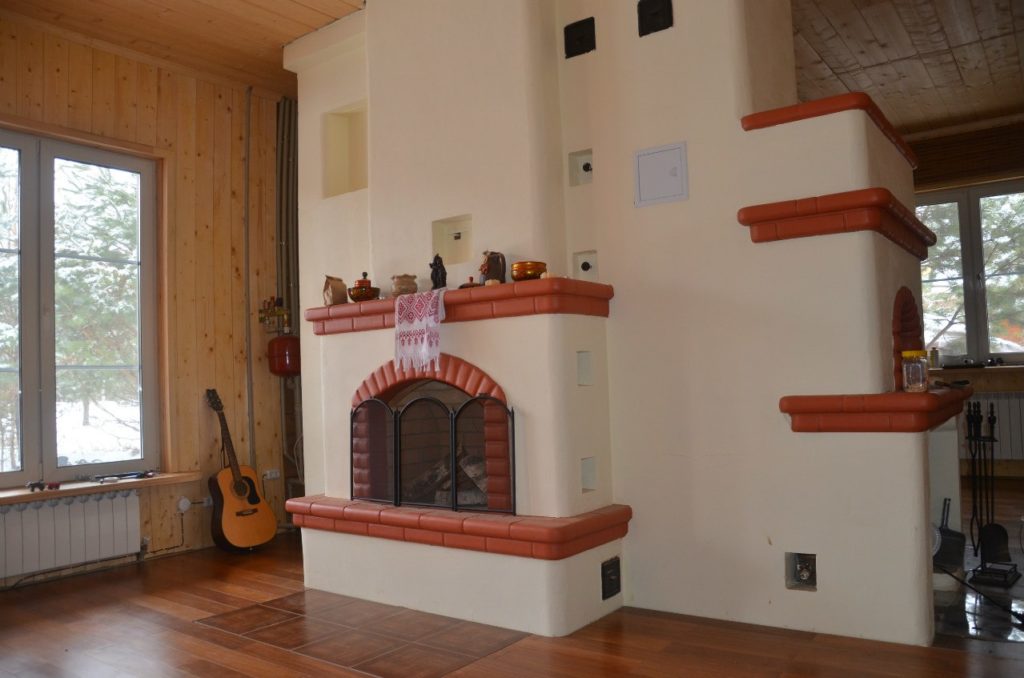
Stove with a Fireplace
Advantages:
- Very low fire hazard.
- Aesthetic appeal.
- High efficiency.
- Evenly heats the room.
A stove with a fireplace is suitable both for decorating the home and for practical use as a heater.
Blueprints
How to build an oven by yourself? First, we need to create blueprints. To make blueprints, you must know what should be included in the oven’s structure.
- Foundation.
- Body.
- Flue pipe.
The stove consists of the following levels:
- Foundation
- Adobe masonry.
- Embedment depth.
- Waterproofing.
- Stove mass.
Stove mass components:
- Logs.
- Underlogs.
- Stove base.
- Heathstone.
- Lintel.
- Damper.
- Half-door.
Flue pipe components:
- Cap.
- Section.
- Insulator.
- Damper.
- Cap liner.
- Metal cap.
- Chimney stack.
- Metal sheet.
- Chimney neck.
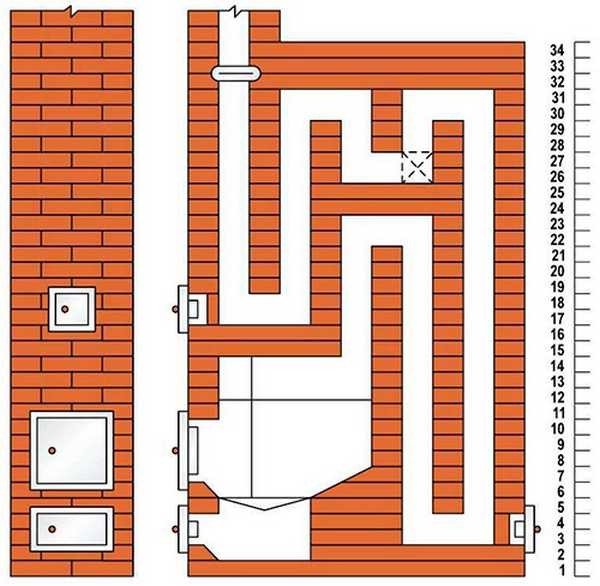
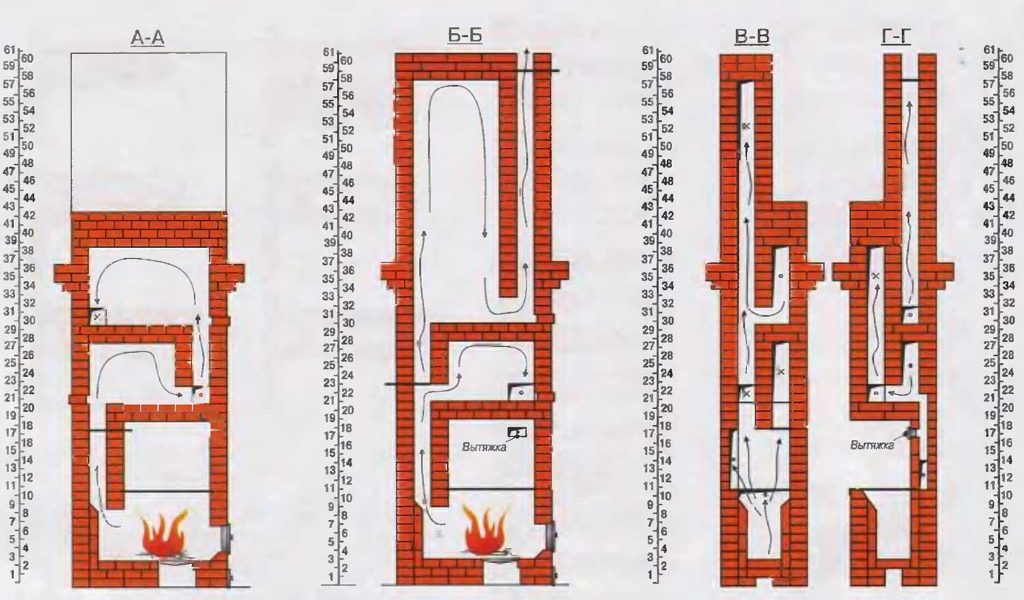
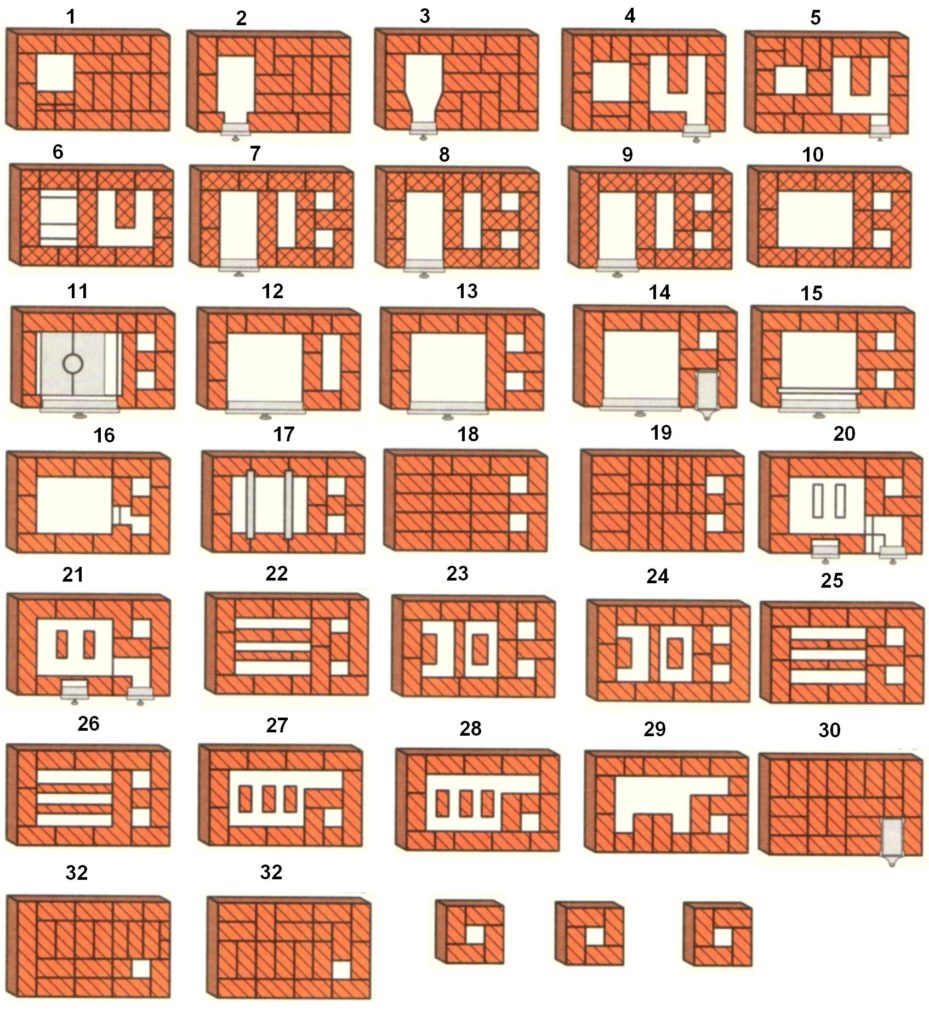
Bricklaying Sequence – Detailed Diagram for Building a Brick Oven
How to build an oven by yourself? Let’s consider how to perform bricklaying, using the example of a Russian stove.
Row number…
- Designed for waterproofing the foundation. Lay beveled bricks and ¾. Use a cement-sand mortar during bricklaying.
- The second row forms the basis for the sidewalls of the hearth area.
- The third row is the sidewalls of the hearth (3/4 brick).
- The fourth row serves as support for the underfire.
- The fifth row is placed at the corners to create support for the arch. This row is also used for laying the underfire.
- The sixth row is laid according to a wooden template, which will serve as a temporary arch for the hearth.
- The row for the vault is started from the edges towards the center. The central brick is pounded with a mallet to ensure strength. Additionally, bricks should be laid as close to each other as possible, and brick chips should be placed in the gaps between them for insulation.
- The hearth walls consist of bricks from this row.
- The stove walls and the walls of the cold stove are laid in this row.
- The final row for the hearth. Fill the gaps between the bricks with sand for insulation.
- Reinforcement of the hearth roof with the addition of beveled bricks.
- Start using clay-sand cement. Bricklaying is done using a chisel. The bricks should be laid flat but will need to be sanded afterward.
- The bricks in this row will become the lintel and the cooking chamber. Additional installation of the mouth arch.
- The walls of the lintel and the mouth.
- The walls of the lintel and the mouth.
- The walls of the lintel and the mouth.
- Build supports for the cooking chamber vault.
- Assemble the vault from fire-resistant bricks.
- The walls of the lintel.
- The walls of the lintel. Fill the gaps with sand.
- Bricklaying of the mouth, starting the samovar hole.
- End of the roof. Installation of the damper.
- Samovar channels and flue.
- The same channels.
- Additional channel for the draft.
- The same channels.
- Installation of the half-door.
- Sealing the seams and the same channels.
- Sealing the seams and the same channels.
- Sealing the seams and the same channels.
- Connection of the pipe and damper.
- Installation of the damper.
- Bricklaying of the pipe.
33+ bricklaying of the pipe.
How to Build a Stove by Yourself: Description of the Process
- Lay the foundation.
- Place the first row (using a string).
- Lay the following rows using a level.
- Control the angles using gauges.
- Use a cement-sand mortar for rows 1 to 11, then switch to a clay-sand mixture.
- The chimney installation is done at the end of all the work.
How to Build a Brick Stove by Yourself Video:
Useful Tips
- Follow the instructions carefully during bricklaying.
- Choose a design that suits your abilities.
- Place the stove not too close to the walls but also not in the center of the room (unless it’s a traditional Russian stove).
- Handle refractory bricks with care when transporting them, as they are very fragile.
- The side walls of the stove are the warmest, so position them closer to the areas that need thorough heating.
- Don’t forget about automated stoves that can control the temperature for you.
Building any of the stoves mentioned above should not be difficult with careful planning and determination. Good luck!