The French phrase “chaise longue” has firmly entered our everyday language as the term “chaise lounge.” Essentially, a chaise lounge refers to a lightweight, elongated, adjustable chair with a backrest that can be moved to a comfortable body position.
These chairs have become widespread, and it’s now challenging to imagine outdoor relaxation without a comfortable chaise lounge.
Loungers can be classified based on the material they are made of, and depending on this, we can understand their advantages and disadvantages:
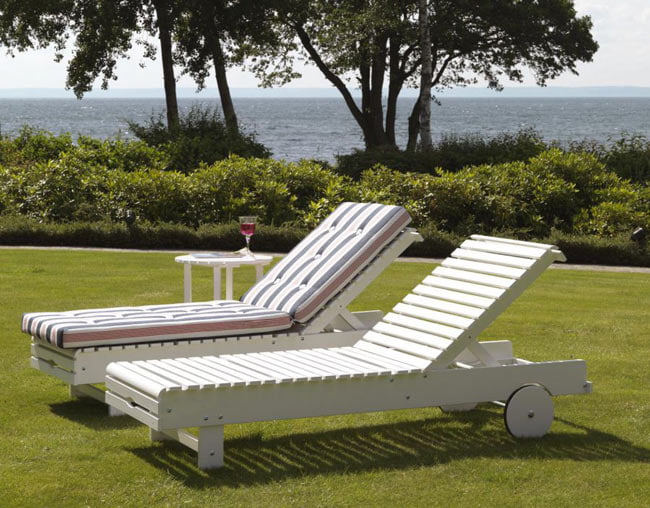
- The first chaise lounges were made of wood. Wooden chaise lounges are still considered the most environmentally friendly and remain popular. However, they have one drawback – weight. Therefore, loungers made of natural wood are often equipped with wheels.
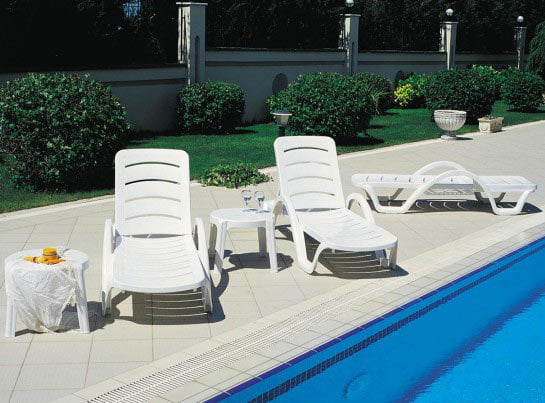
- The easiest to maintain and budget-friendly option is plastic chaise lounges. They are lightweight, compact, and mobile. Their main drawback is their short lifespan. Plastic quickly deteriorates outdoors, and plastic fittings break easily.
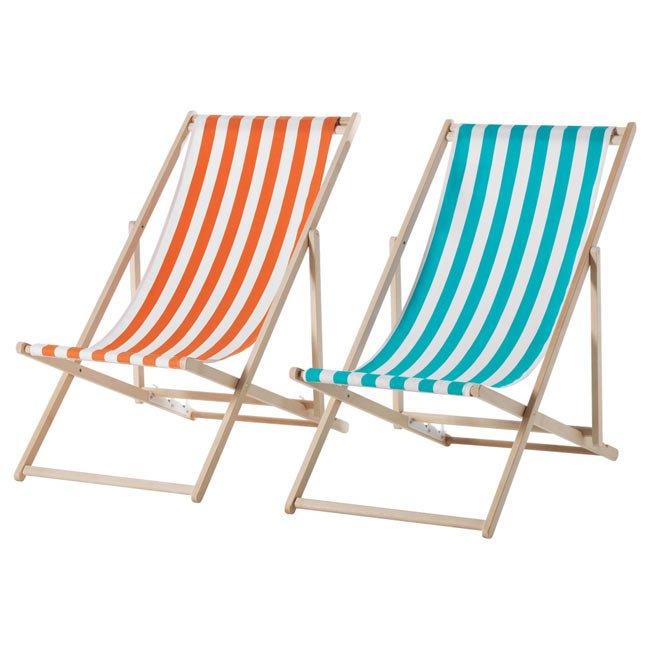
- A very good and mobile solution is fabric chaise lounges. The frame for them can be made from various materials – metal, plastic, wood. They are lightweight and excellent for transportation and trips.
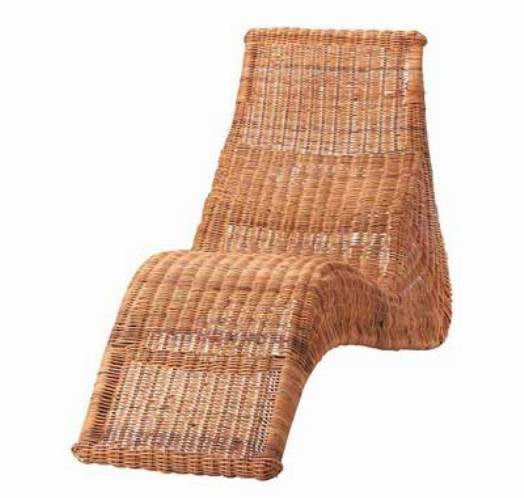
- Rattan chaise lounges are also an environmentally friendly and elegant choice, similar to wooden chairs. Such loungers harmoniously fit into the interior of gardens and hotel areas. Besides their decorative appeal, they have many positive qualities but come with a major downside – they can be quite expensive.
In this article, we will explain how to create a beautiful and comfortable chaise lounge on your own using readily available materials.
General Recommendations
Before starting any work, it’s essential to remember that not only the material has a cost but also the time and effort invested in creating the product.
A chaise lounge is a piece of furniture that will be used outdoors and will, therefore, be exposed to all external factors. Therefore, before assembly, it’s important to take steps to protect the materials to ensure that the lounger serves for a long time and fulfills its functions.
If you decide to create a chaise lounge from natural wood, it’s advisable to treat the wooden components with antiseptic liquids, primer, wood preservatives, varnish, and other substances before assembly. This procedure will provide protection against rot, insects, mold formation, reduce flammability, and give the structure an aesthetic appearance for many years.
Fabric chaise lounges should be treated with special sun-resistant impregnations at least once a month to prevent fading and to provide water-repellent properties.
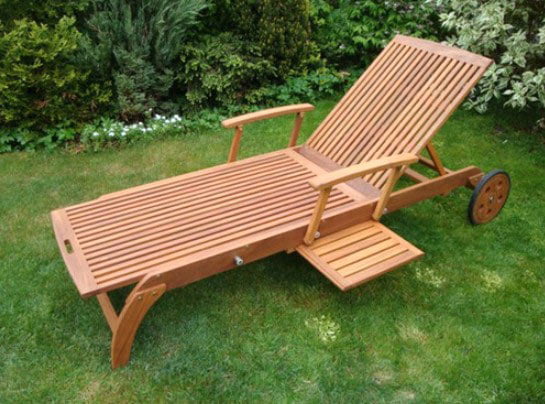
Solid Wood Chaise Lounge
Massive wooden chaise lounge models stand out due to their increased strength, eco-friendliness, and comfort for relaxation. However, because of their significant weight, they will need to be equipped with wheels for easy transport.
When choosing the type of wood for a chaise lounge, you can confidently use any softwood species. They are very practical and are available in the budget-friendly price range.
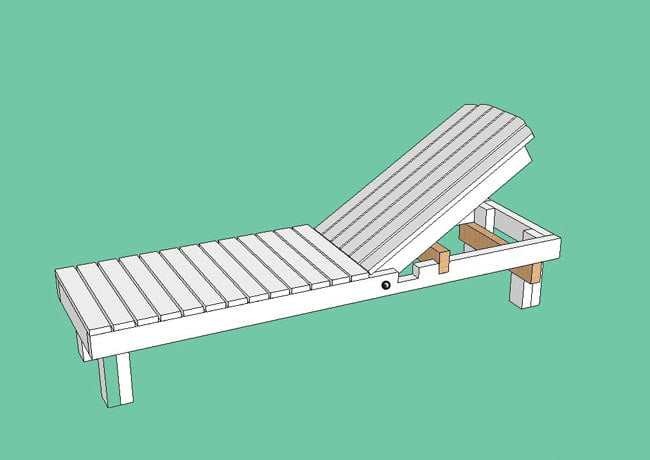
Scheme for making a solid wood chaise lounge:
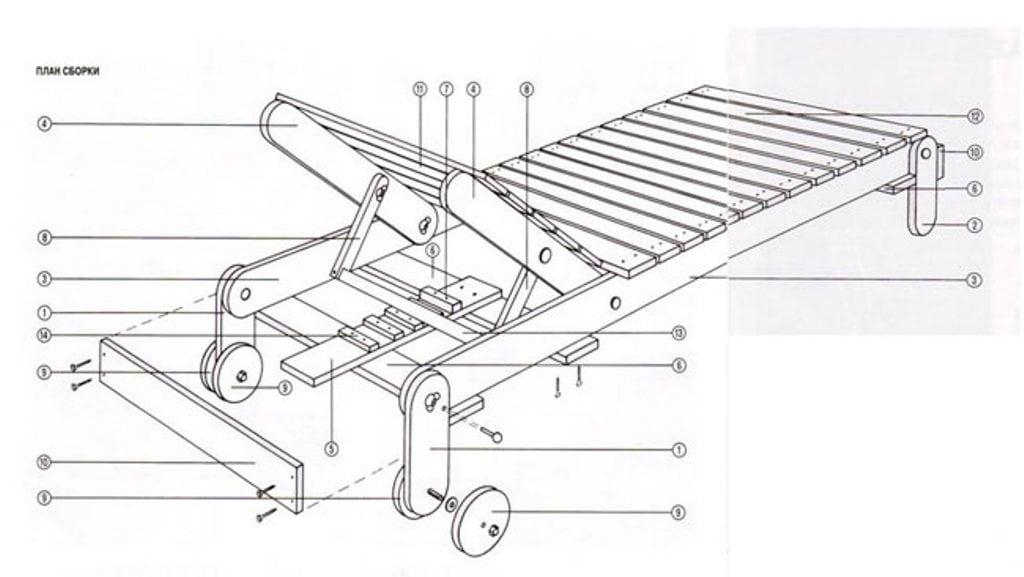
Legend:
1 – front legs;
2 – rear legs;
3 – longitudinal load-bearing element;
4 – main (load-bearing) element for the backrest;
5 – backrest support;
6 – cross load-bearing planks;
7 – plank for fixation;
8 – support for the backrest of the chair;
9 – wheels;
10 – end beam;
11 – planks for the backrest;
12 – planks for the seat;
13 – cross-supporting beam;
14 – fixation plank.
The standard factory size for any type of chaise lounge is 190 cm by 60 cm.
However, since we are talking about a DIY chaise lounge, its dimensions are at the discretion of the manufacturer.
Assembly of a wheeled chaise lounge:
- Use a saw or jigsaw to cut the beams to create the frame. Secure the structure with bed brackets;
- Cut and sand the cross planks;
- Attach the obtained planks to the frame;
- From the beams, cut the legs (standard height is 5 to 10 centimeters). In the prepared pieces, drill holes (about 6-7 cm from the ends of the beam). Attach the wheels to the legs using 12-16 mm diameter bolts;
- For the decking of the structure, cut the boards (standard size 8 cm by 60 cm);
- Secure the planks to the base with screws, leaving a gap of a couple of centimeters between the boards. Use a countersink bit or a drill with a countersink to “sink” the screw heads into the boards;
- Join the two assembled parts (for the body and headrest) into a single structure using door hinges;
- Install a supporting plank under the movable part (the backrest);
- Decorate the chaise lounge with sandpaper, primer, paint, or varnish;
- The finished lounger can be complemented with cushions, a thin mattress, and padding.
Simple Wooden Chaise Lounge
You can create a simpler wooden lounger with the following materials:
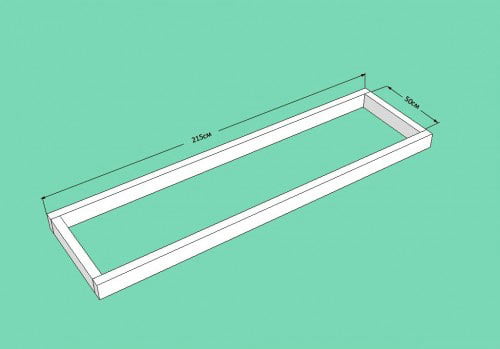
- For creating the frame, you’ll need two beams, each 2 meters and 15 centimeters long;
- 2 beams for crossbars, each 50 centimeters long;
- For the backrest of the lounger, you’ll need boards sized 5×10. This includes 2 boards, each 88 centimeters long (for the long part of the backrest), 3 boards, each 39 centimeters long (for the short part of the backrest), and 1 board, 60 centimeters long;
- 6 legs, each 35 centimeters high;
- 6 planks for the backrest latticing (25×8×60);
- 13 planks (25×8×60) for covering the seat.
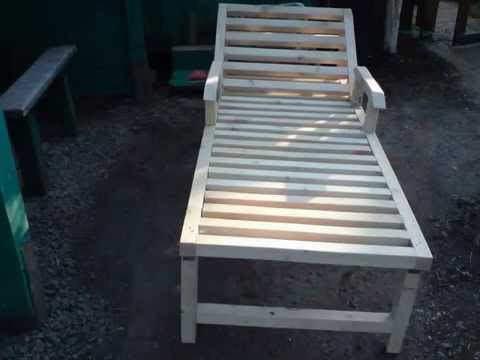
Here is the step-by-step assembly with the accompanying diagrams:
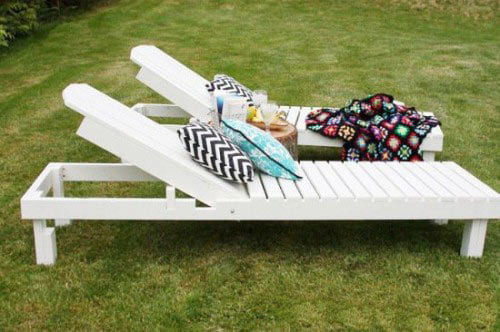
The diagrams and the image should help guide you through the assembly process of this simpler wooden chaise lounge.
Assembling the main frame:
Form the main frame by securing two long beams (215 cm each) with screws to two shorter beams, each measuring 50 cm.
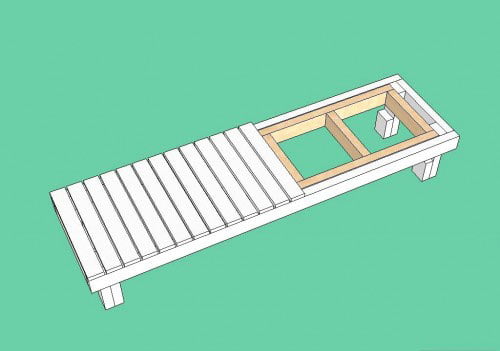
Assemble the seat by using screws to attach thirteen 60 cm planks to the frame. Leave about a centimeter of space between the planks.
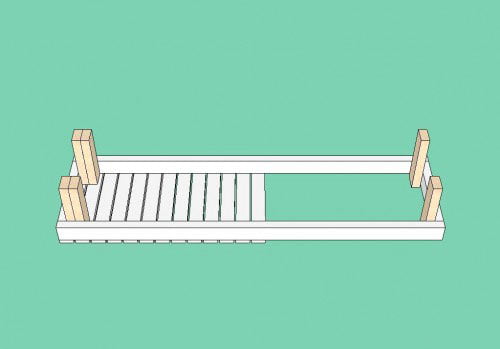
Attach the legs. To ensure stability, attach two legs (four in total) to the part where your legs will be positioned and one leg to the headrest (two in total).
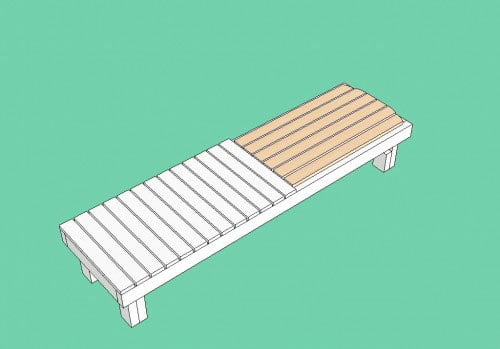
Cover the backrest frame with planks measuring 88 cm and 39 cm lengthwise, leaving a 1 cm gap between them. The backrest should fit freely into the main frame of the lounger.
After securing the planks with screws, smooth out any roughness and unevenness with sandpaper.
Attach the backrest to the main frame using dowels. First, drill holes on the sides of the seat and backrest. The distance from the edges of the beams to the holes should be about 9 centimeters.
This completes the assembly of the wooden chaise lounge.
Assembling the locking mechanism for the reclining backrest:
In the main frame of the lounger, create two notches for support. One notch should be positioned 10 centimeters from the dowels, and the second one should be 20 centimeters from the first notch. The depth of the first notch should be 10×10 cm, while the second one should not exceed dimensions of 5 cm by 5 cm.
Horizontally, place a 60-centimeter beam into the first notch to act as a support. To adjust the position of the backrest, you can move the beam to the second notch, but this time, position it vertically.
The final step involves sanding, sealing, and painting the lounger.
Video: Making a DIY Garden Lounger
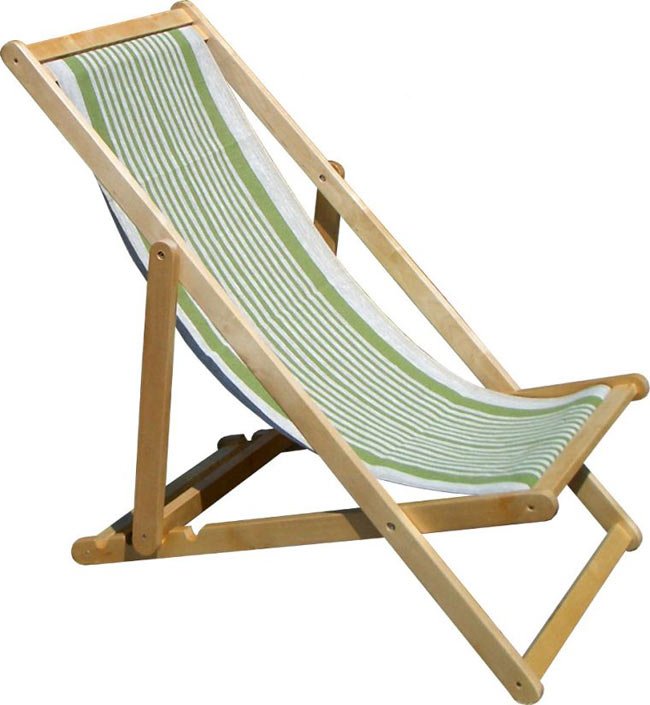
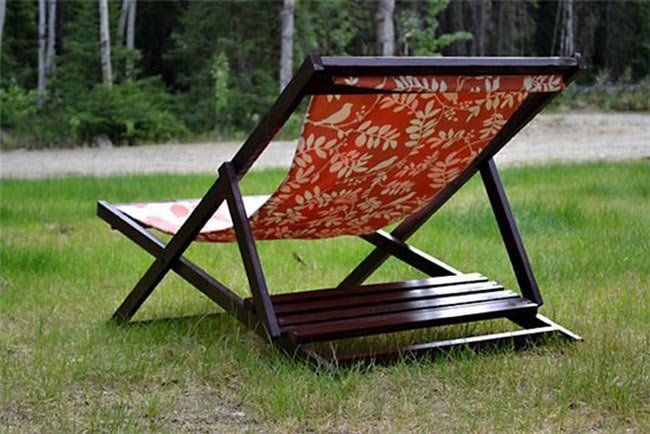
Fabric Chaise Lounge
You can easily create a simple fabric chaise lounge, as shown in the photo below, without much effort.
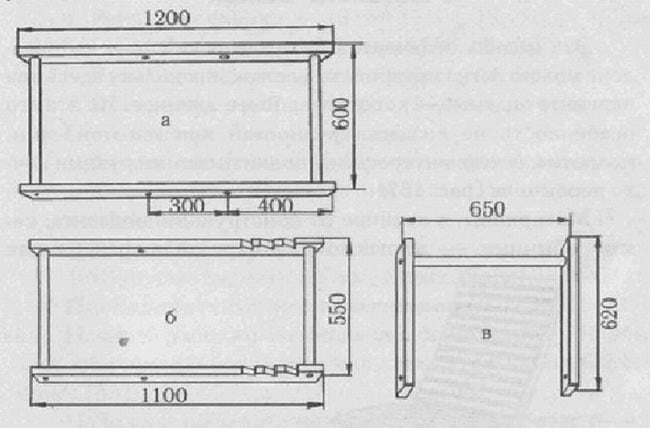
The construction of the chaise lounge consists of three frames with the following dimensions:
- 1200×600 mm (labeled as “a” in the diagram);
- 1100×550 mm (labeled as “b” in the diagram);
- 650×620 mm (labeled as “c” in the diagram).
Cut the boards to the required sizes and sand them smooth.
Drill holes with an 8 mm diameter in the longitudinal beams and clean the holes with a file. The distances between the holes on the beams should be 70 cm and 40 cm.
To adjust the recline of the backrest in frame “b,” create 3-4 notches spaced 10 centimeters apart. Smooth the notches.
To connect the frames, drill holes at the specified locations as shown in the diagram. Assemble the frames together. Initially, secure frames “a” and “c” to each other with screws. Then, use screws to connect frame “a” to frame “b.”
Cover the structure with fabric. Before attaching the fabric with nails to the frame, make measurements and ensure a proper fit. Make sure the fabric hangs slightly when the lounger is in the folded position and is slightly taut in the fully horizontal position. If the fabric fits well, wrap it around the curved bars of frames “a” and “b” and secure it with nails.
This completes the construction of the fabric chaise lounge.
Tips for choosing materials for a fabric lounger:
- For creating the lounger’s frame, it’s best to choose hardwoods such as oak, yew, beech, or birch;
- The fabric for the lounger should also be reliable. Very durable and long-lasting fabrics include denim, canvas, tarpaulin, or camouflage.
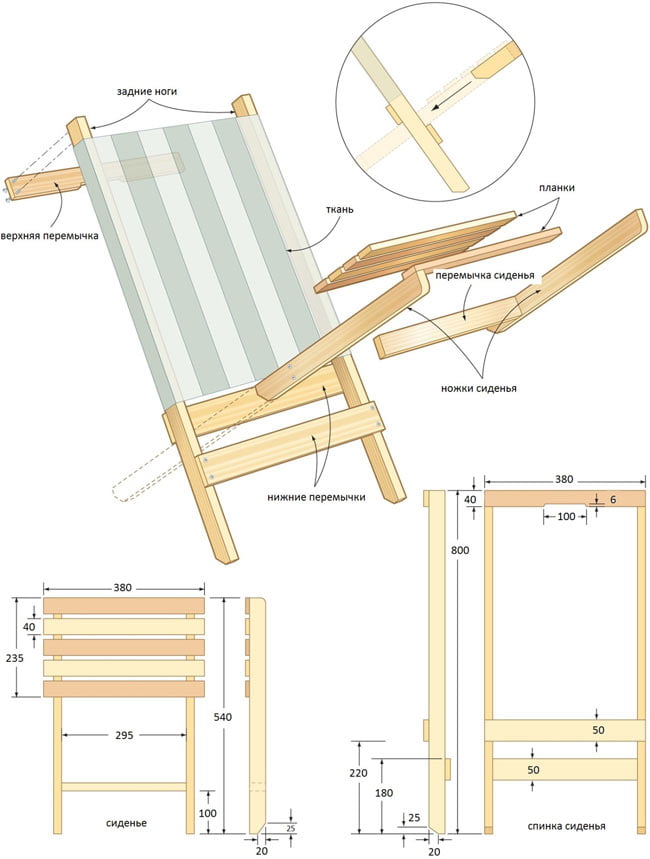
DIY Fabric Lounger. Model 2
Treat all wooden elements of the structure: sanding, protective coatings, and painting.
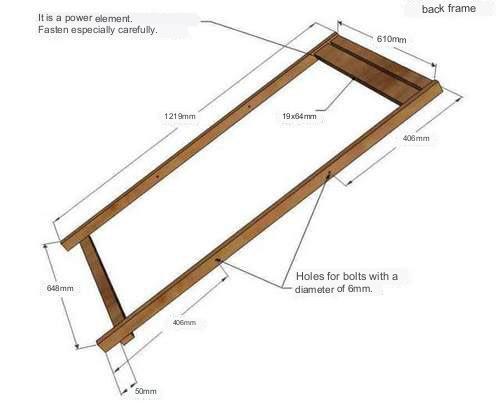
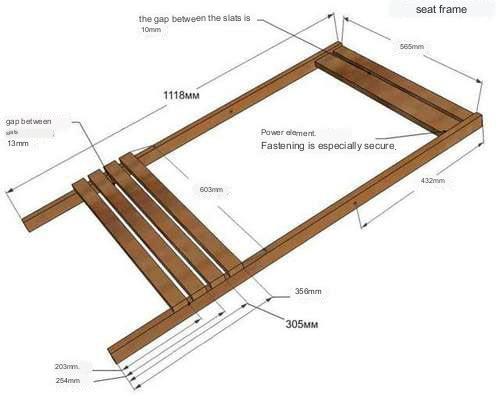
On the chair’s blueprint, there are additional crossbars that secure the recline of the chair’s backrest. These elements should be prepared in advance, and slots should be made for them. The distance between the slots can range from 20 to 35 cm.
Drill holes for bolts at a height of 0.41 m on the backrest’s frame rails. Do the same for the seat frame, but take a distance of 0.43 m.
In the center of the top of the slats that support the lounger’s backrest, drill holes. All drilled holes should be well cleaned with a file.
Assembling the Lounger
Assemble the frame for the backrest as indicated in the diagram. The rail at 0.61 m should be securely fixed, as it bears the main load. Leave a small space between the two upper planks at the headrest of the backrest through which the fabric can be passed later.
According to the diagram in the photo, assemble the seat of the lounger. Fold the backrest and the seat together and connect them with bolts. Place a washer between the parts at the attachment points. According to the drawing, install the structure to support and adjust the position of the backrest.
Carry out final work: sanding roughness, decorating the wood with stain and varnish. Cover the lounger with fabric. Preprocess (overlock) the edges of the fabric. Stitch the lower and upper edges of the cut (forming continuous loops) so that wooden rods can be passed through them. Slide the fabric onto the rods. Pass the rods with fabric between the backrest and footrest planks.
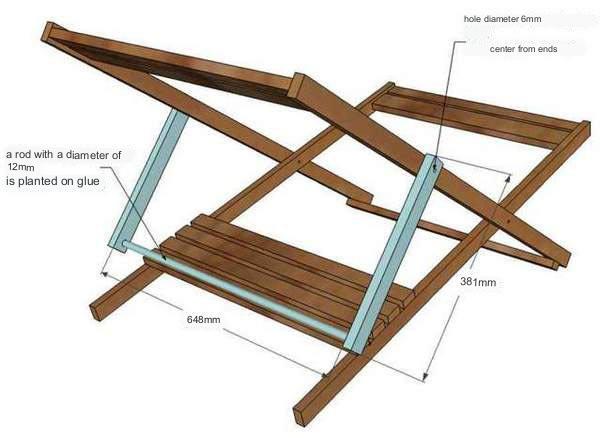
The advantage of this model is that the fabric on the rods can be easily removed and washed.
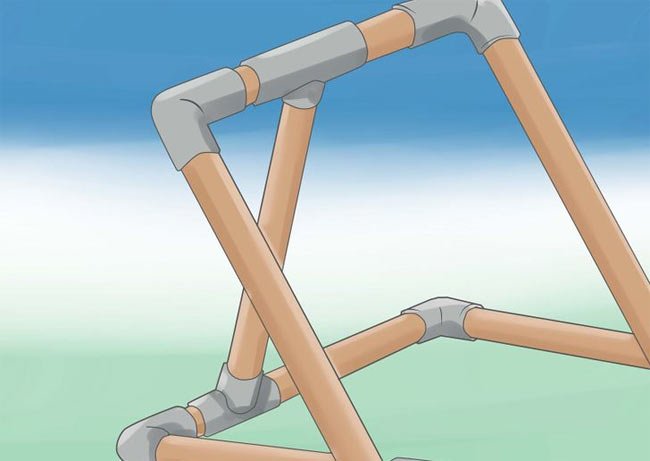
PVC Lounger
This type of lounger model also involves the use of fabric, but the lounger’s frame is assembled from PVC pipes.

To make a fabric lounger from PVC on your own, you will need the following materials:
- Two-inch PVC pipes;
- 8 pieces of G-shaped connectors;
- 6 pieces of T-shaped connectors;
- A piece of sturdy fabric.
To construct this PVC lounger, you need to assemble two rectangular frames.
First, cut the PVC pipes into the required lengths. You can customize the dimensions of the lounger to your liking. The provided blueprint for the PVC lounger is based on specific dimensions.
To create the first frame, take 2 pipes measuring 30 and 45 centimeters and connect them with a T-shaped connector. The core of the connector should be facing inward within the frame. Place G-shaped connectors on the ends of the resulting longitudinal pipe. In the same way and with the same dimensions, assemble the second vertical pipe.
The length of the horizontal crossbars is 66 centimeters. One crossbar remains intact and is attached to the vertical pipes with G-shaped connectors. The second one consists of two segments of 30 cm each, joined in the center by a T-shaped connector.
As a result of these straightforward manipulations, you should obtain a rectangular frame.
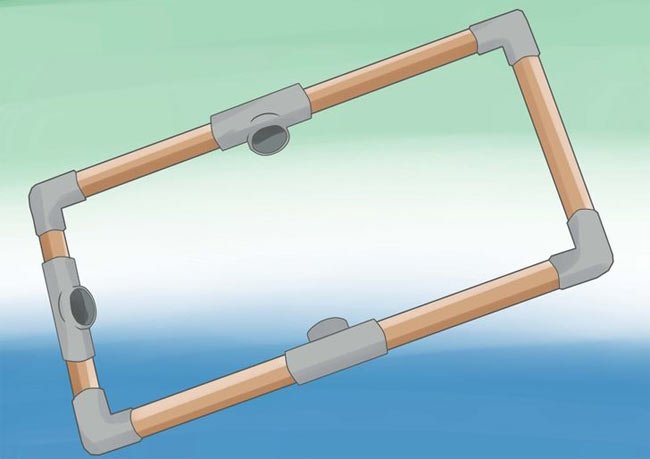
Following a similar scheme, assemble the second frame.
Create the connection for unfolding the lounger. Cut a 5 cm piece of pipe and insert it into the T-shaped connector of the vertical part.
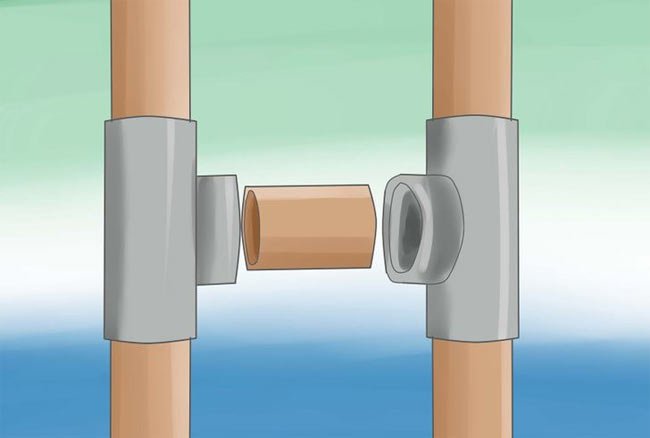
As a result, you should have two rectangular frames, one of which should easily fit into the other.
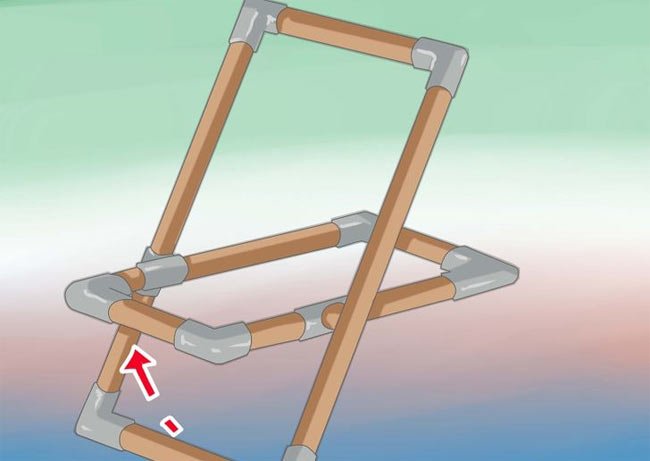
Fasten the frames together. Measure the horizontal distance between the T-shaped connectors. Cut the pipe to the required length and attach it to the connectors. Attach the rear support at a comfortable recline angle for sitting.
Cover the completed structure with fabric.
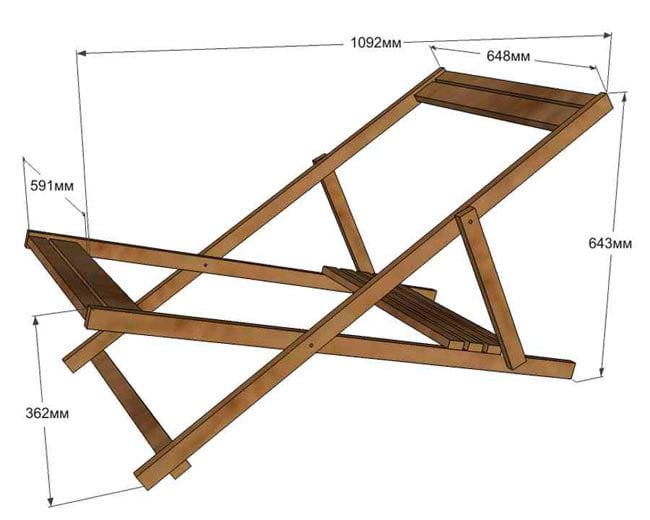
Portable Chair Lounger
This is a very simple and lightweight construction that consists of two parts – a wooden seat and a fabric-covered backrest.
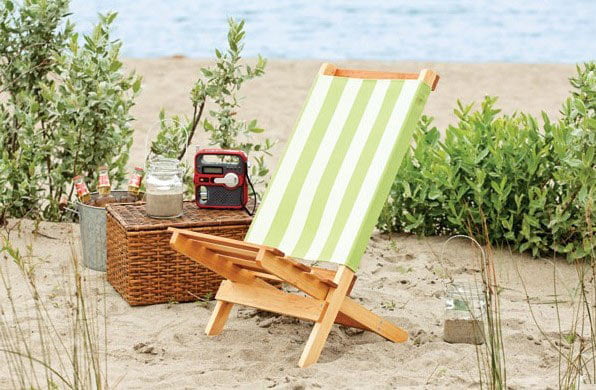
The photo provides a step-by-step assembly scheme for the portable lounger.
Before assembly, all wooden parts need to be treated in advance. Wood screws are used to connect the elements. The fabric can be attached with small nails or staples.
Kentucky Chair
You can also create a very simple and lightweight Kentucky chair with your own hands.
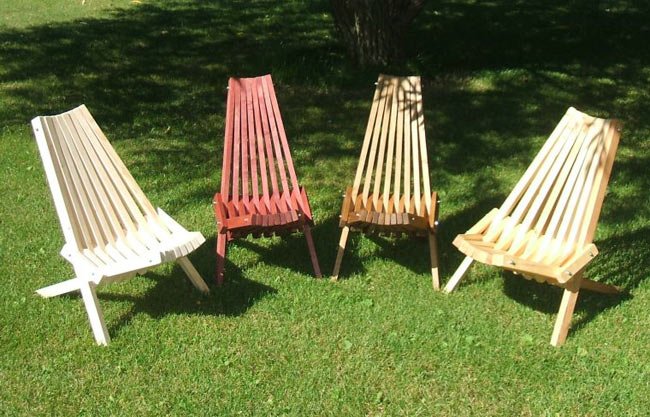
Assembly of the Kentucky chair (drawing and diagram).
Drill a hole in each rail, slightly wider than the fastening element (wire or dowel). Lay out the rails according to the diagram and insert the dowels/wire into the holes.

Secure the ends with brackets. Slightly lift and straighten the rails.

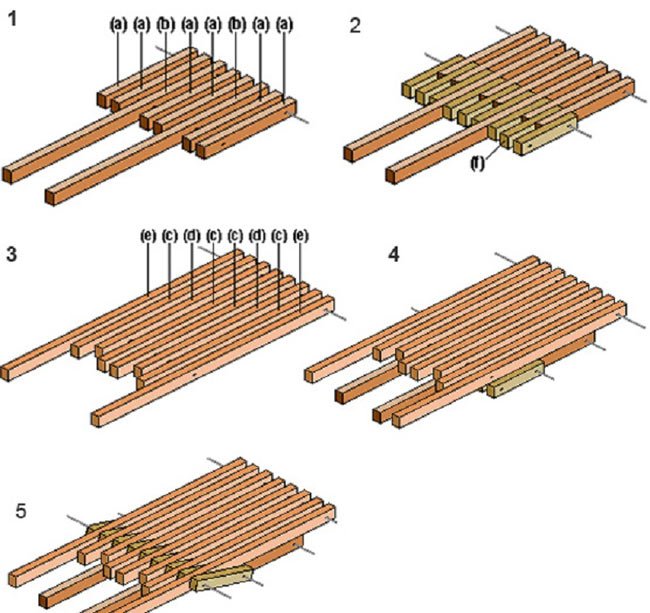
Important: before starting the assembly of wooden elements, they need to be fully processed with sandpaper and protective and decorative coatings.
For more details, watch the video of the process.
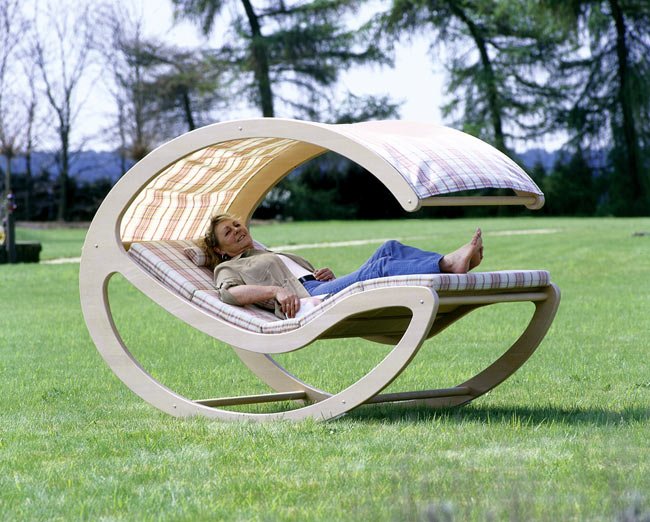
Original Lounger
The market for outdoor furniture offers a wide variety of designer lounger models. Some of these models can cost tens of thousands of dollars. However, with a little imagination and effort, you can create an original lounger with your own hands for a more modest price.
Here’s an example of a model from the well-known garden furniture brand Design Koalition with a fabric canopy.
To create a similar standardized lounger with dimensions of 1.6×1.8 meters, you will need the following materials:
- Plywood sheets – 2 pieces, 1600 by 1800 mm, thickness of two centimeters;
- Wooden planks with a round cross-section – 6 pieces, length 920 mm, cross-sectional diameter of 30 mm;
- Plywood slats (you can use scraps from the main sheet) – 12 pieces, 94 cm in length and 10 cm in width;
- Fasteners (screws, bolts, glue, nails);
- Cardboard for creating a template (pattern) of the lounger;
- A piece of sturdy fabric at least one meter wide.
The lounger’s drawing with measurements is shown in the photo:
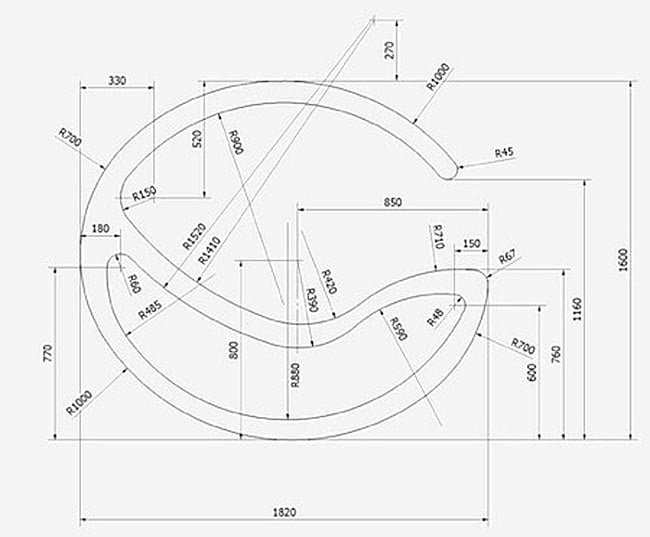
Transfer the drawing to cardboard while adhering to the dimensions. Cut out the obtained templates, and using these stencils, transfer the drawing onto the plywood sheets.
Cut out the necessary elements from the plywood. Where the diagram provides for connections, create 30 mm diameter recesses. Smooth out any roughness, unevenness, and defects so that all parts of the structure are smooth.
Form the plywood frame. Insert the wooden beams into the pre-made recesses and secure them with screws. For secure connections, coat the ends of the beams and all joints with glue. Press and allow the glue to dry thoroughly at all glued areas.
Screw the slats in place, creating stiffening ribs for the entire structure. The spacing between the slats should be 10 centimeters.
Prime, putty, and paint the plywood structure.
Stretch the fabric canopy onto the finished lounger. The size of the canopy can be varied as desired. To secure the canopy, you can use Velcro, tie loops, or a zipper.
Birch Lounger
Another original DIY lounger model is made from birch logs, but you can replace birch with any other type of wood. This lounger is not mobile and needs to be assembled at the location where it will be placed.
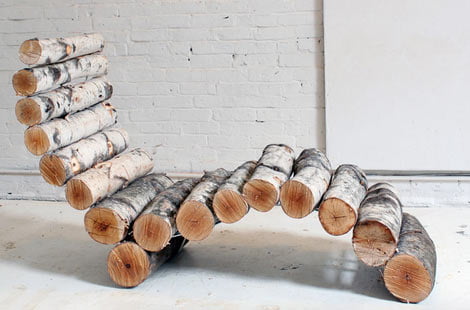
To create this model, you will need birch or other logs with a diameter ranging from 75 to 120 mm.
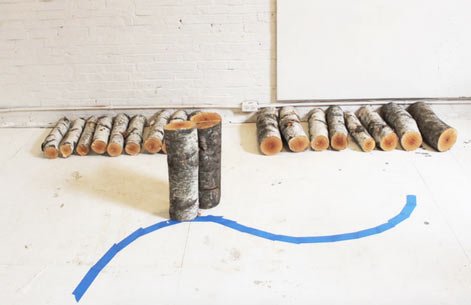
The assembly of such a lounger is very straightforward:
- Cut the logs into pieces measuring 65 cm in length;
- In the chosen location for the lounger, mark the lounger’s dimensions using chalk, sticks, and painter’s tape;
- Arrange the logs according to the marked pattern. Secure the logs together with long screws;
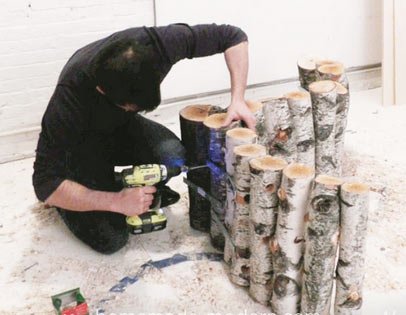
- Place the finished structure in its designated location and, for added stability, secure the rear part of the lounger with brackets.
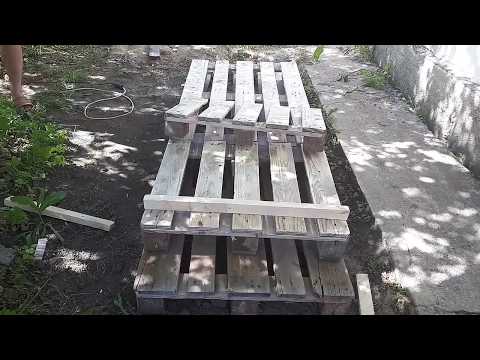
Pallet Lounger
Construction materials are often delivered on pallets. Instead of disposing of these pallets, you can use them to create unique garden furniture.
In the video, another variation of a lounger is presented, which you can craft from construction pallets with your own hands.