For vegetation to grow and develop properly, it requires moisture. However, weather conditions often bring surprises – scorching sunny days are followed by heavy rains. Setting up a drip irrigation system manually is one of the optimal options for organizing irrigation on a country plot.
This solution has numerous advantages. Manual drip irrigation for a garden doesn’t require regular human presence, which is crucial for those who only visit the countryside on weekends. Therefore, many owners of country plots are interested in the question of how to set it up.
A person who does not have special knowledge and experience can create drip irrigation with his own hands for a summer residence. This system is very economical, and has earned a lot of positive feedback due to its undeniable advantages:
- water is not overused as the plants are irrigated locally;
- moisture level in the soil can be adjusted;
- weeds are reduced;
- the balance of air and water is maintained in the soil;
- the root system is fed and watered synchronously;
- no need for constant monitoring;
- minimum energy consumption;
- gives plants resistance to fungal processes;
- It is much easier to grow garden plants.
Drip Irrigator
After the drip irrigation system was invented, it gained great popularity. At first, the greenhouse industry was the main industry of its application, and then open soil, where vegetables and fruits are grown. This system is also used in viticulture.
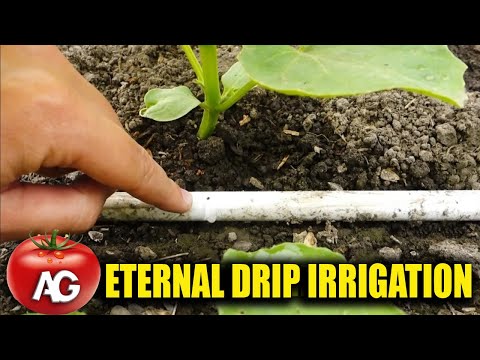
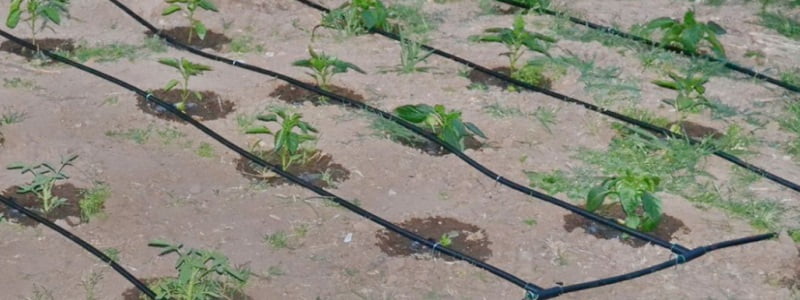
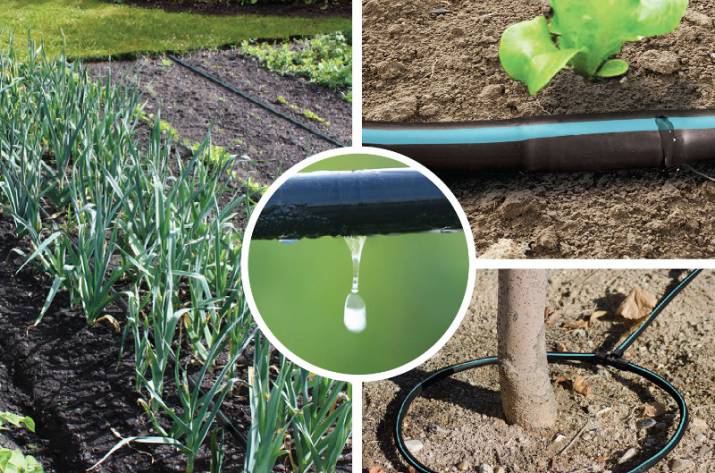
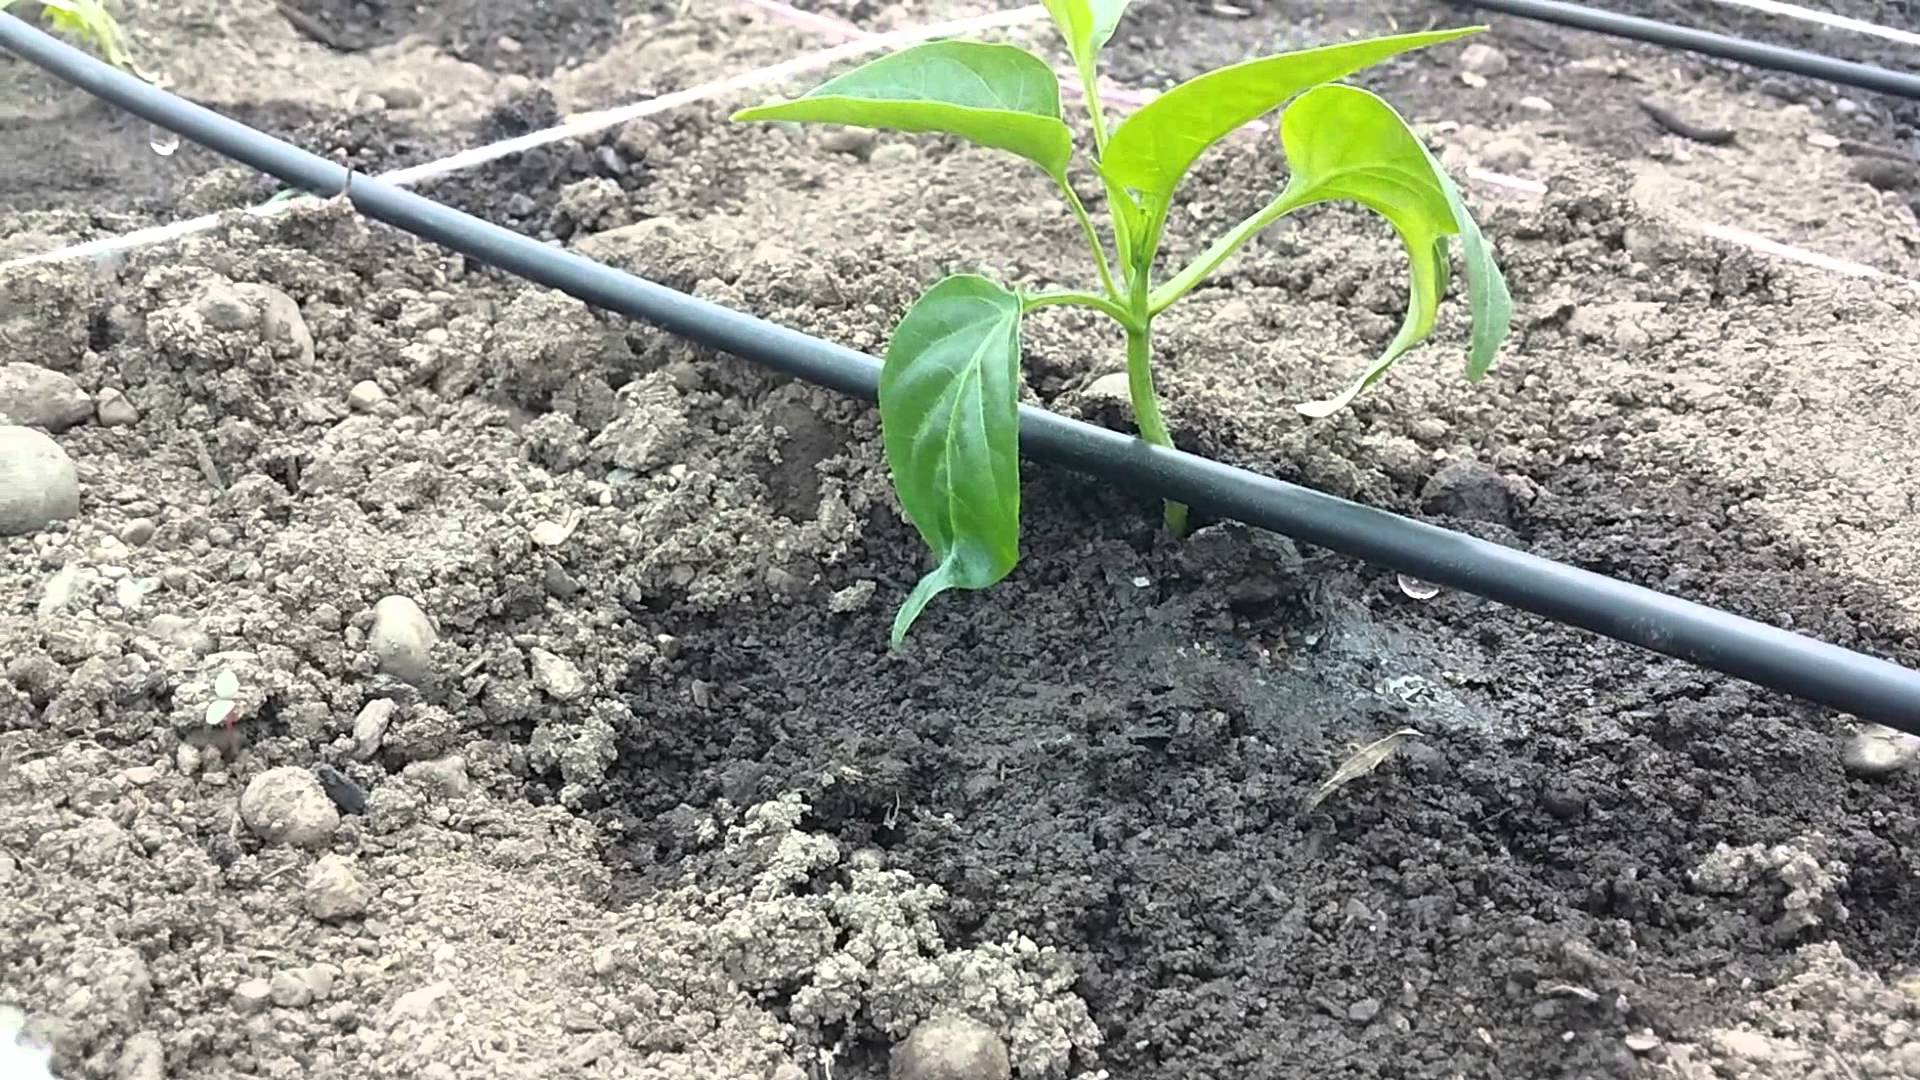
A modern drip irrigation device is a flexible hose in which droppers are mounted. Droppers help to equalize the supply of moisture around the entire perimeter. This hose is installed on the surface of the earth. In some cases, it is buried in the soil along the entire required irrigation perimeter. Today, drip systems are presented on the market in a wide range.
It will not be a problem to create drip irrigation with your own hands for a summer residence. However, the drip irrigation device, despite the differences in various models, does not have fundamental differences. It consists of the following mandatory elements:
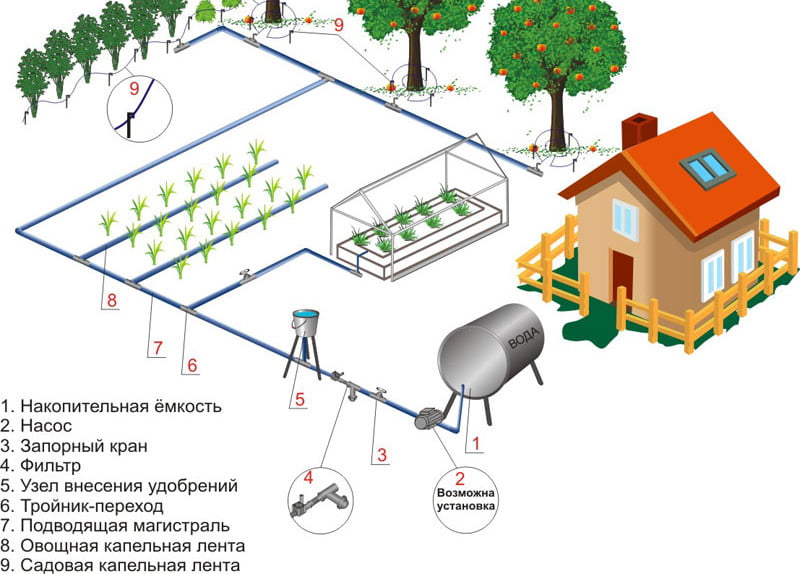
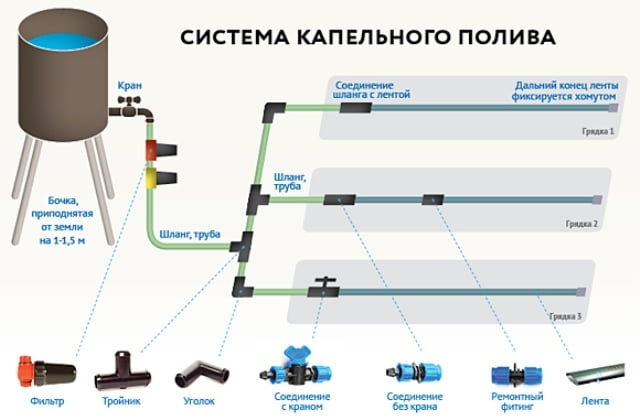
- a node that takes water. Its role can be played by a different container, which rises to a height of one to two meters. Water supply occurs either independently, or a suitable pump is used for this purpose. Water can come from a river, a pond, a well, a well, a lake, or an aqueduct. It all depends on your desires and capabilities;
- The filtration unit is one of the most important elements of the system, which determines its performance indicators and the duration of its operation. It is designed to purify water and protect droppers from clogging;
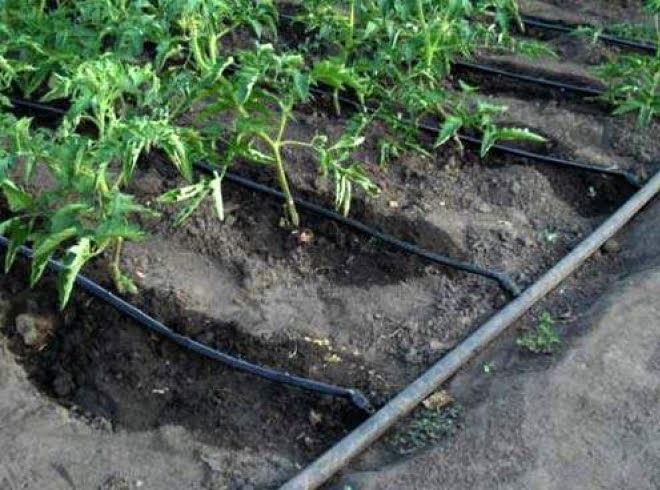
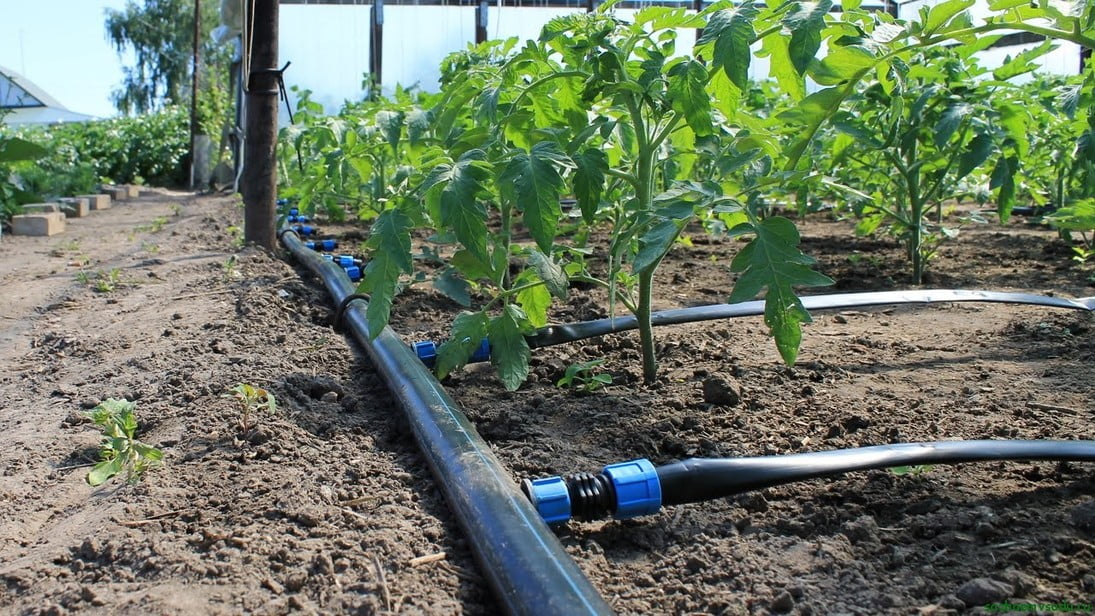
- pipeline of the main type – its task is performed by pipes made of polyethylene or PVC, having a diameter of at least 32 mm. This is where the fittings for the drip tape or tubing are mounted. When creating drip irrigation with your own hands, you can use the simplest option, like a regular garden hose, with which a garden is watered. The only condition is that it should not let in light so that algae does not grow inside;
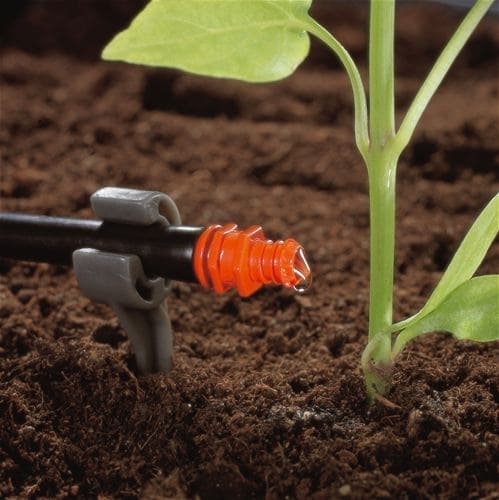
- distributing type pipeline – a lined tube into which droppers are mounted. They can have different shapes – flat or cylindrical, a certain gap must be observed between them, ranging in size from 10 centimeters to one meter;
- furniture elements and fittings – connect all of the above elements, creating a single system. It is possible to use in this capacity both threaded connections and adapters. To connect the system to a water source, a variety of elements are used in the beds, such as tees, corners, transitions, couplings, plugs, and fittings. The latter can be with or without a faucet. Taps allow you to water crops that require different amounts of water. When creating drip irrigation with your own hands, it should be borne in mind that the use of fittings made from ferrous metal alloys is prohibited. This material is not resistant to corrosion processes, and rust subsequently clogs the system.
Drip irrigation scheme
A drip irrigation scheme is an extensive water supply network that brings moisture to the root systems of plants. The drip irrigation scheme is very simple – first, from a well, lake, water supply, or other source of water, it is supplied to the water intake unit, and then, through the main pipes and drip tubes, it moves directly to the roots of the plants. Drip irrigation, compared to conventional irrigation, does not violate the natural structure of the soil. Plants will not get burned even with excessive sun activity, which leads to moisture on the leaves.
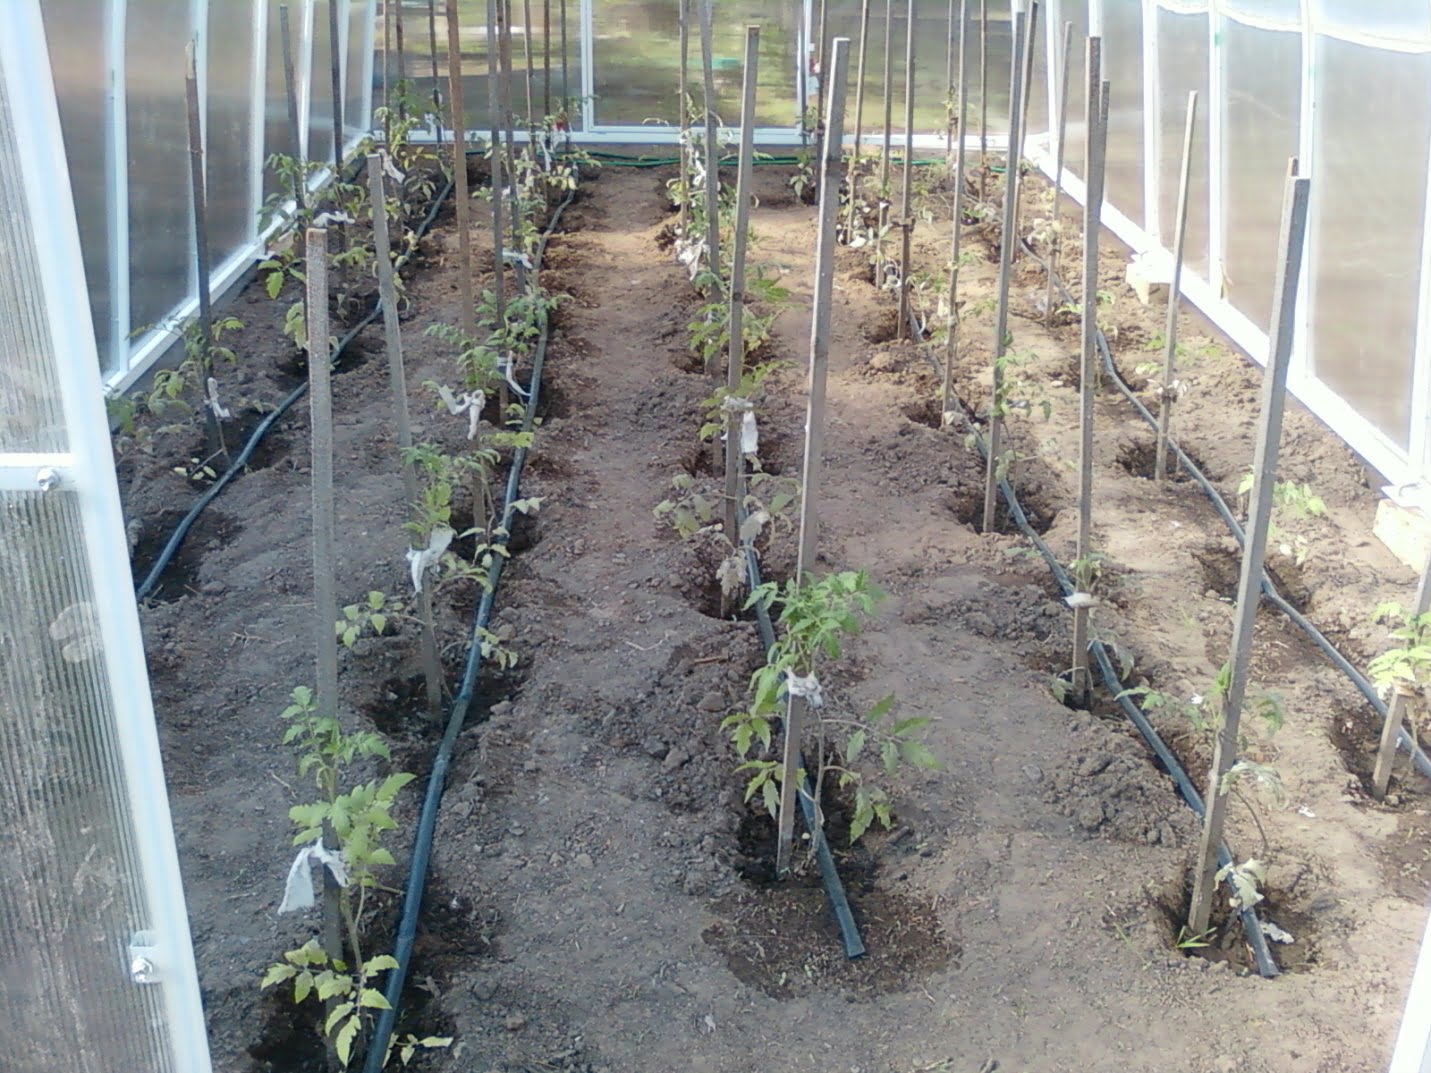
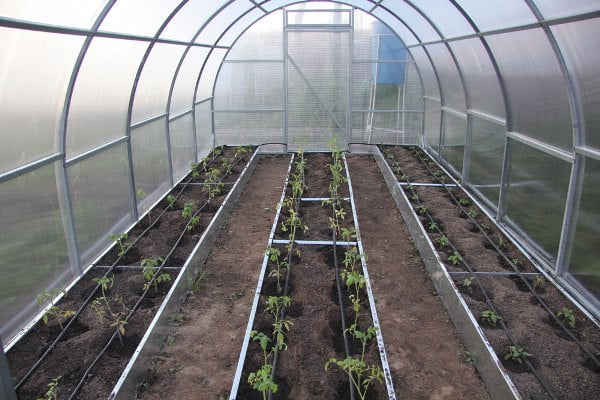
You can create a similar scheme both in the greenhouse and in the open field. Do-it-yourself drip irrigation in a greenhouse should be done to provide plants that are not provided with precipitation with the necessary amount of moisture. Lack of water will lead to their death. Do-it-yourself drip irrigation in a greenhouse is a significant help for a person who does not have the opportunity to constantly care for cultivated plants.
After you create drip irrigation in the greenhouse with your own hands, you will notice a significant increase in plant yields, the incidence of plants will decrease, and their appearance will improve. This will provide you with economical water consumption. In this case, excessive moistening of the surface layer of the soil will not occur, with normal moistening of the deeper layers. Each plant will receive water in the required amount.
The scheme of a modern drip system can be automatic – this allows you to determine the exact dosage for each plant and will contribute to the organization of fractional irrigation. The circuit can be equipped with connected rain sensors – if there is enough rain, water will not be supplied.
Automatic elements allow you to determine convenient conditions for turning on irrigation, for example, at night, when a sufficient amount of water is collected in a water supply system or a well. The rather high price of automatic elements is justified by the numerous advantages of such a scheme – it does not require human participation, so you can leave the dacha for a fairly long period.
How to make drip irrigation with your own hands
Even a novice summer resident can create drip irrigation himself. Some constituent elements should be bought in specialized shopping centers. When choosing pipes of a distributing type, you first need to determine their exact suitable length and diameter. This should be decided based on the planned water flow and a suitable irrigation scheme.
However, when doing drip irrigation yourself, it is better to choose the simplest possible scheme, with a minimum number of branches and components. Each element that enters this system is a kind of blockage zone, which leads to the accumulation of dirt.
Creating drip irrigation yourself is a fairly simple task. It is enough to create a simple plumbing system, since its excessive complexity will lead to difficult movement of water, and will require frequent repairs.
In various shopping centers and stores, you can purchase all the necessary elements to create such a design. They have a wide price range. The cost of a particular component is determined by its quality, materials used to create it, and operational and technical characteristics.
How to make drip irrigation with your own hands from improvised materials? It is possible to use various plastic pipes or flexible hoses, however, certain conditions must be met:
- Water should be supplied in the same volume through which it exits through the holes so that it evenly irrigates all plants;
- Drippers should not be too narrow to prevent clogging.
To create a reliable, convenient, and efficient drip irrigation system, flexible soft medical hoses are suitable. The diameter of the main hose should be 1-2 centimeters. It is also possible to use used medical systems with thick needles as hoses (for solution containers). Half-meter-sized tubes that are put on needles are also useful. Needles are stuck diagonally into the main hose – and the irrigation system is ready.
Clogging of such droppers is quite rare, and it is very convenient to clean them. Such a system has the only drawback – the rapid growth of algae, subject to direct sunlight. However, this drawback is easily corrected – the structure can be covered with a black material that does not let the sun’s rays through.
Before starting the installation, you should mark out the planting plan, determining the duration of each bed and the gap between them. If all the plants on the site are evenly distributed, you can create a structure, focusing on the finished plantings and the gap between them. The tubes are cut into pieces of suitable length, and connected into a single system. It is better to place the tubes with a slight slope, giving structural strength through the pegs.
The length of the line should not be too long, and be approximately 6-8 meters. Holes are punched in suitable places where tubes and needles are inserted. After the installation is completed, the operation of the system should be checked under high-pressure conditions. You also need to check how quickly the water flows out. The speed is adjusted by changing the inclination of the hoses.
To prevent frequent clogging, a filter should be placed on the hose. In its role, you can use foam rubber, which is easily removed and washed. To prevent direct sunlight from leading to algae growth, the lid covers the water tank, and the foil covers the tubes.
DIY drip irrigation system
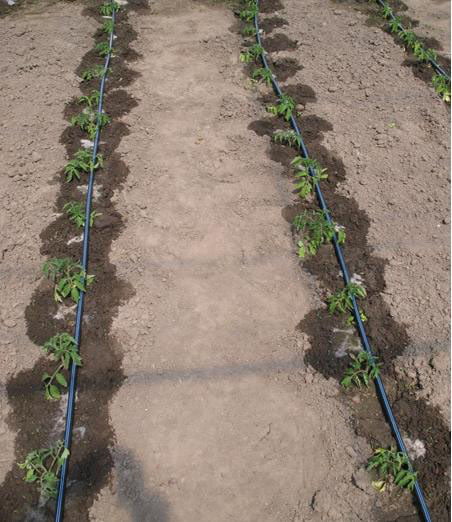
Do-it-yourself drip irrigation system is represented by two main varieties. The most popular do-it-yourself drip irrigation system, the basis for which are drip tubes, or drip tapes. The drip tube is made of polyethylene, its diameter can reach 20 millimeters, and the wall can be two millimeters thick. The droppers are connected to the tubes externally or internally.
The material for the manufacture of drip tapes is also polyethylene. They are folded into a tube and connected under the influence of temperature. The role of droppers is played by miniature holes that remain after connection, or make their way on the outside. These tapes are up to 300 microns thick. A suitable do-it-yourself drip irrigation system is selected based on individual preferences, capabilities and requirements, the size of the irrigated area, and types of crops.
The drip tube system is designed for high-pressure and continuous use. Similar systems are used to irrigate orchards and vineyards, as well as in landscape design. They allow you to supply water over considerable distances and are capable of supplying up to 2 liters of water within an hour. For the winter, such a structure can be disassembled and reassembled in the spring.
Drip tape systems are designed for use in low-pressure conditions and are used to water vegetable crops in vegetable beds. Such a system consumes water according to certain standards. Some models have adjustable water flow rates.
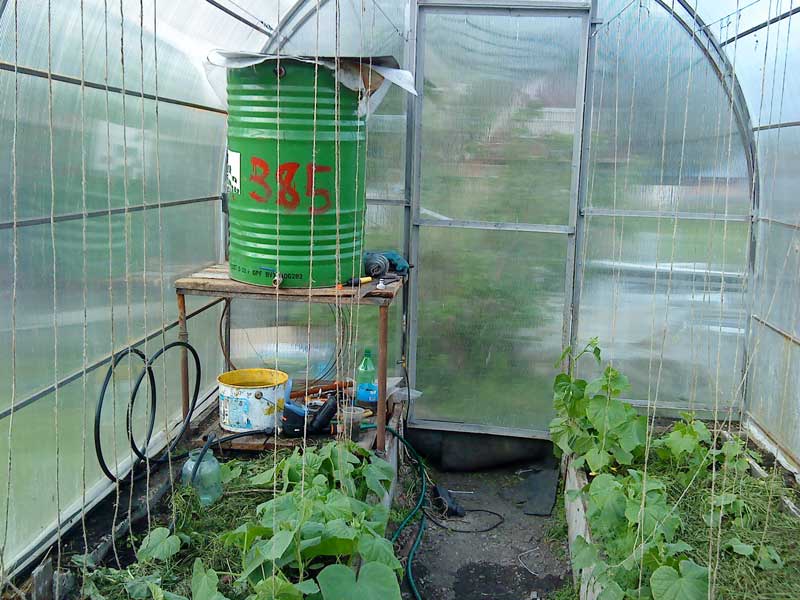
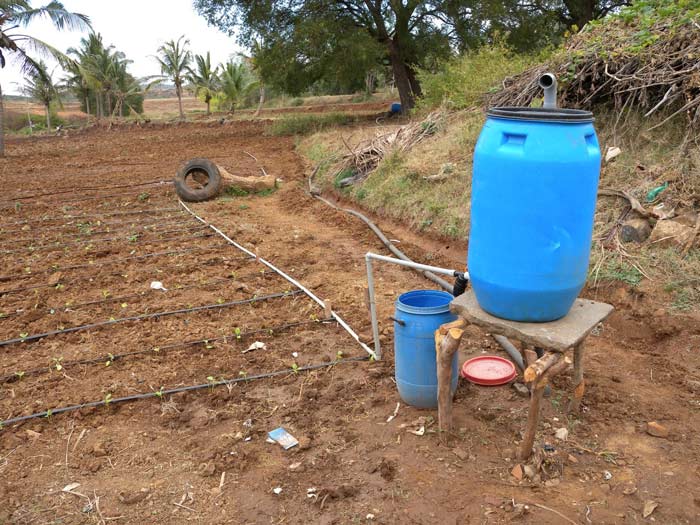
Drip irrigation from a barrel
Drip irrigation from a barrel supplies water in a gravitational way – a water intake tank supplies it by gravity. Instead of a barrel, you can use any type of container filled with a mains water supply system, or a natural source of water. Drip irrigation from a barrel can also be provided by rainwater.
Drip irrigation from a barrel can clog algae, plankton, or suspended particles, as well as the result of corrosive processes. Therefore, the material for the manufacture of the barrel should be a material that is not affected by corrosive or destructive processes. It can be a material of synthetic origin, plastic, or galvanized iron. The barrel must be covered so that leaves, debris, or dust do not get into it.
The volume of the barrel should be chosen based on individual requirements and the general need of the vegetation of the site for water. So that the system was able to irrigate the garden, and there was no need to constantly replenish moisture reserves. The flow of water must be continuous.
It is best to place the barrel 1 to 2 meters above the ground to ensure proper pressure. Water should be as clean as possible. The drain hole should be approximately 10 cm from the bottom to prevent accumulated sediment from entering the hose. For this design, any type of filter element is suitable. The filter must be washed regularly. Droppers designed for use in low-pressure environments should be used. Drip irrigation for a greenhouse from a barrel is the best option.
When creating drip irrigation for a greenhouse from a barrel, you should start by installing a submersible pump, with a capacity that can provide water supply around the entire perimeter of the site. To remove the tube, you can drill a special hole in the lid or the bottom of the barrel. This is where the gasket and sealant come in. The main pipe along the perimeter of the greenhouse is bred with a fitting. Each pipe or hose is equipped with a plug. The design can be supplemented with various automatic, electronic, or mechanical elements, such as a timer.
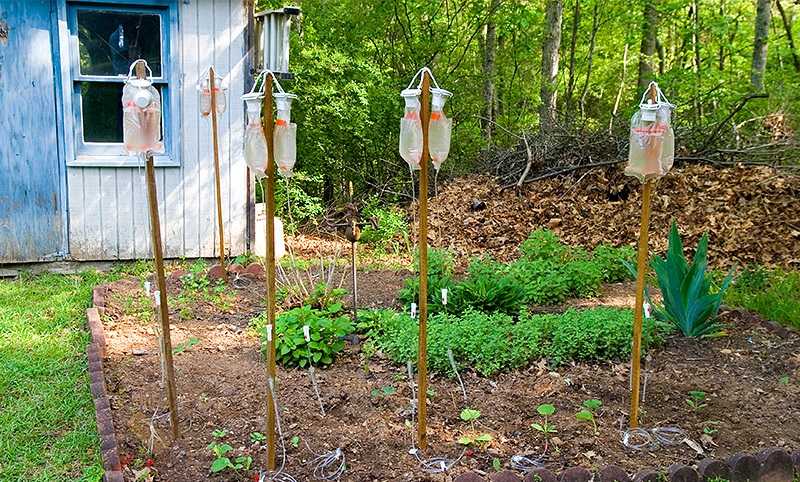
Do-it-yourself drip irrigation from plastic bottles
Do-it-yourself drip irrigation from plastic bottles is a solution that is very popular due to its many advantages. One of its main advantages is a simple device – a bottle made of plastic is dug around each plant. Small holes are made in it. The bottle is filled with water, it gradually seeps through the holes made. Thus, the root system of plants is evenly fed with moisture.
Creating drip irrigation from plastic bottles with your own hands requires minimal financial costs since empty plastic bottles can be bought for a completely symbolic price, or found at home or in your neighbors. Also, its arrangement is simple. This does not require special knowledge or skills. Do-it-yourself drip irrigation from bottles can be created by everyone. Its creation will greatly simplify the care of plants in the greenhouse. You can safely leave the site for quite a long time.
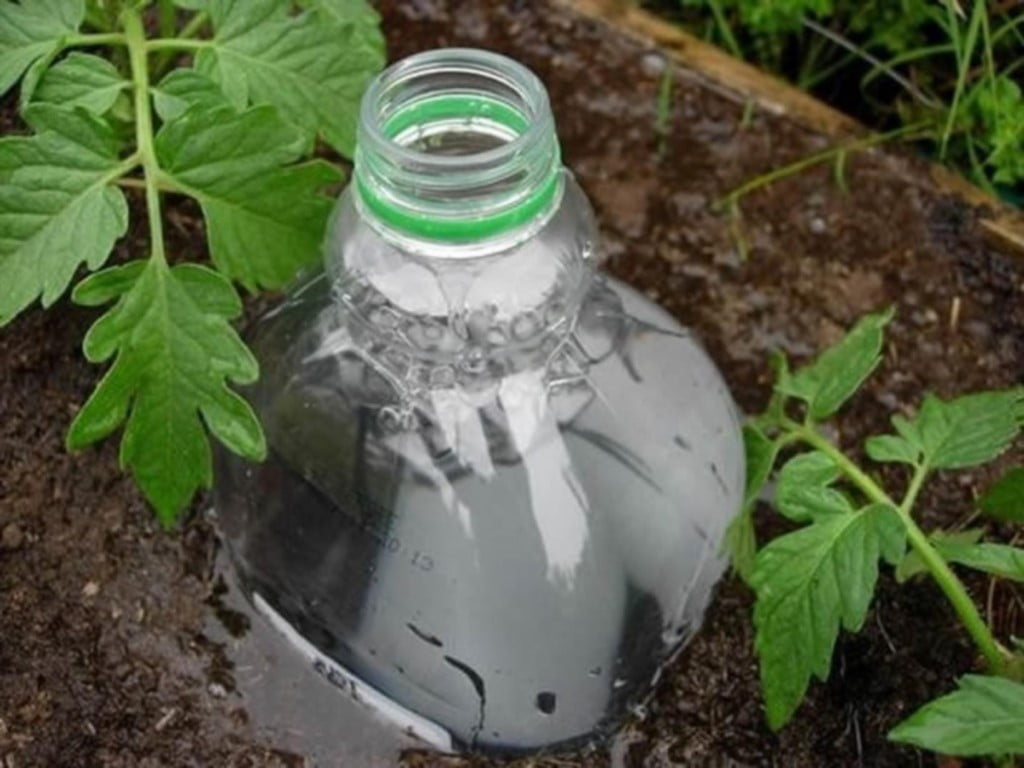
Another advantage of the decision to make drip irrigation from bottles with your own hands is the autonomous operation of the system. Unlike other systems, it does not require a water tank – just fill the bottles with water. Thus, the question of how to make drip irrigation in a greenhouse is solved very quickly and simply.
In addition, plants are irrigated with water corresponding to the temperature of the air in the greenhouse. This helps to improve the condition and increase the yield of various crops. If any element of the system fails, it is very easy to replace it with a new one – you just need to dig out the bottle and replace it with a new one.

Do-it-yourself drip irrigation from polypropylene pipes
Compared to using conventional metal pipes, do-it-yourself drip irrigation from polypropylene pipes has numerous advantages. They are light in weight. Such drip irrigation can be done with minimal financial costs.
On the inner walls of such pipes, various deposits are almost completely absent. Pipes made of polypropylene can last more than half a century. They are suitable for constant intensive use and are resistant to condensation. The installation of such a system is simple.
Drip irrigation design mistakes
When looking for an answer to the question of how to make drip irrigation in a greenhouse, people often make mistakes at the design stage, as well as during operation:
- Excessive water savings, and low moisture supply. Since the drip system leads to higher yields and growth, the root system requires more moisture. The drip system can rationalize the flow of water. However, water should be provided in the right amount for the plants to avoid the exact opposite of the desired result. Therefore, the container should be selected by the needs of the crops grown;
- Choosing the wrong drip irrigation system. The choice of system should be based on the conditions of a particular site. A pipeline with a too-small diameter is not suitable for a large area. You should also pay attention to the pressure level of the system;
- Selecting a dripper with the wrong flow rate – it may not be suitable for the type of soil. The right dripper turns the earth into a flat wet strip;
- Mistakes made during editing. When installing the irrigation system, you should strictly follow the instructions.
Drip irrigation tips
To understand how to make drip irrigation in a greenhouse as efficient as possible, the following tips will help you:
- Before installation, draw a detailed diagram of the room, indicating its size and location of plants;
- Choose hoses of the right type;
- Think about how the water containers will be located. What volume will be optimal for your site, how will the container be filled, how will the pipelines be laid, and where will the fittings be located;
- If possible, it is best to use rainwater for irrigation;
- The water tank must have a minimum volume of one hundred liters, regardless of the size of the greenhouse;
- Calculate what spare parts and system elements you will need, and in what quantity.
How to make drip irrigation with your own hands. Video.