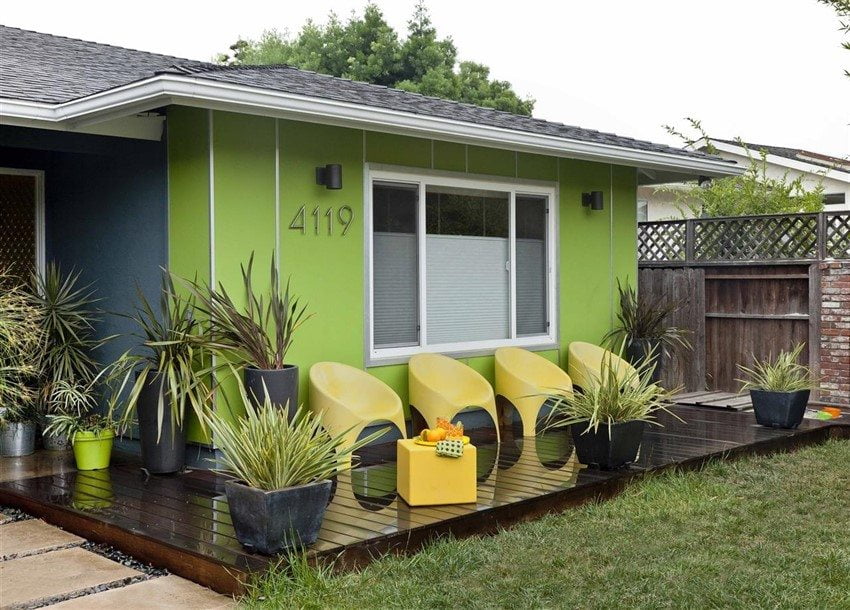
Most likely, everyone knows that a porch in any house must serve a purpose and harmoniously blend into the building’s exterior since it’s considered the calling card. There are many different ways to construct a porch for a private house. All of this depends directly on your taste, the chosen materials, and the overall budget. Nevertheless, it can easily be said that building a sturdy and durable porch with your own hands is entirely feasible.
Porch Structure and Its Main Types
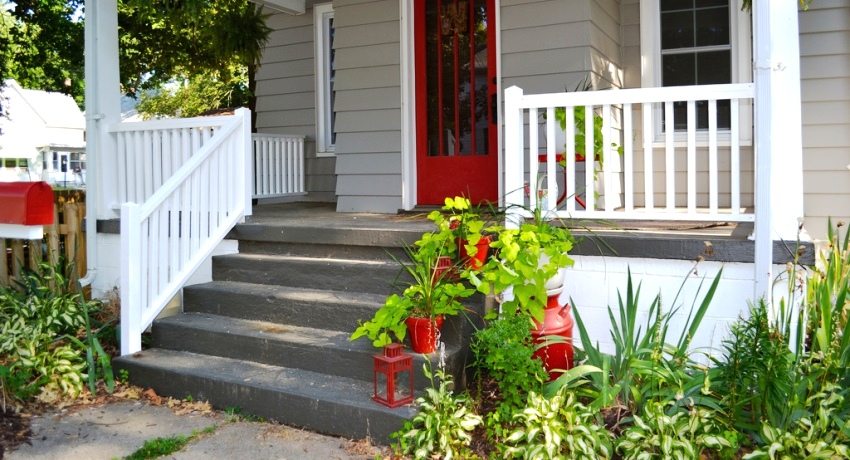
The porch itself consists of a completely open platform, often with stairs, located in front of the entrance to the house. It can take any shape, with or without a canopy, and can be made from various materials.
In principle, the porch structure for the house can be divided into three types:
- Attached;
- Integrated;
- Simple.
So, what sets them apart?
A simple porch is just a platform with steps and a canopy. During the construction of this type of porch with your own hands, the most challenging part is pouring the foundation, as it’s necessary even for a basic wooden porch structure.
An integrated porch, built with your own hands, is designed from the start in conjunction with the house, so it’s constructed more substantially.
The attached type outwardly doesn’t have any significant differences from the integrated version, the only thing is that it’s slightly modified and slightly reconstructed. The advantage is that such a porch with your own hands can be easily attached through minor modifications.
Remember! Any porch requires a foundation, as it prevents even the slightest deformation of the steps during seasonal temperature changes.
Foundation Construction for All Types of Porches
The most crucial thing is that the main foundation for a porch attached to a house must be similar to the house’s foundation. If it’s not the case, during soil settling or winter frost, your structure will deform. It’s also possible that during soil settling, your structure might shift towards the house, and in such a scenario, the porch’s foundation, being less massive, will be the first to suffer. To rectify this situation, minor repairs won’t suffice, and you’ll need to rebuild everything from scratch.
Since a enclosed porch is not meant for living and doesn’t have any large furniture, you can use a regular concrete cushion as the foundation.
However, when choosing concrete, brick (white or red), or decorative stone, it’s essential to reinforce the foundation. The reason is that this structure places a much larger load on the foundation than a wooden porch attached to the house.
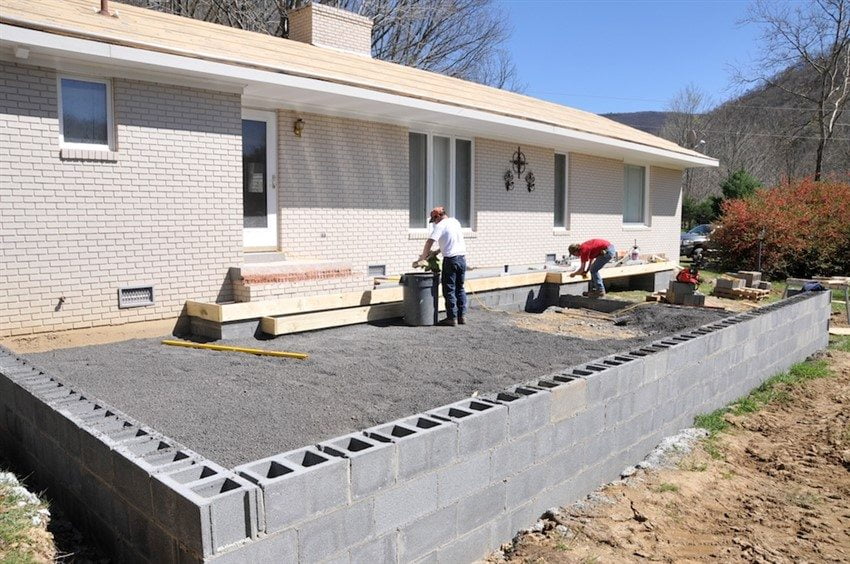
To build a porch foundation with your own hands, you should start with marking. First, determine a rectangular area of the required size, ensuring that the porch fits within it. Then, drive piles into each corner of the rectangle and begin digging a pit along the perimeter. Its depth should be no less than that of the main foundation.
Tip! There’s no need to dig the foundation too deep. Although the load during foundation shifting will be slightly less, it’s impossible to completely avoid it in case of slight soil settling or sharp temperature changes.
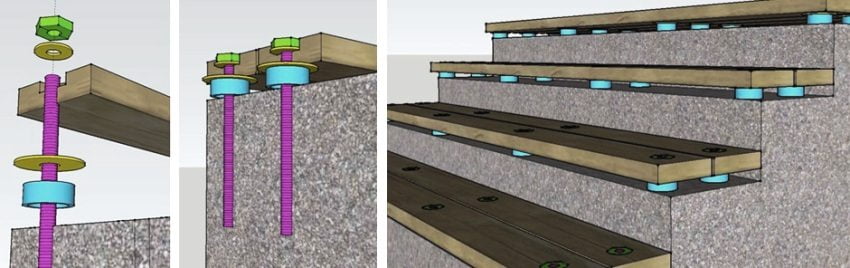
If you decide to install an awning over the porch, you’ll need support posts. In this case, extend the rectangular pit by 20-30 cm on all sides, and you can drive the piles after finishing the porch construction.
To accomplish this, leave small rectangular areas of untouched ground (approximately 20×20, maybe 30×30 cm) where the supports will be placed later. Then, drill holes in each of these spots, firmly place the support, drive it in as far as possible, and thoroughly fill it with concrete.

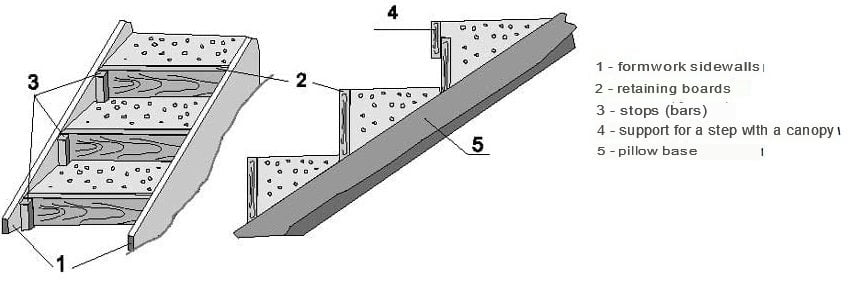
In this case, formwork is highly suitable. However, if the soil is rocky, you can do without it. To create formwork, you can use a variety of materials—plywood, engineered wood, or regular planks that are left over from construction. Just remember that plywood and engineered wood are quite moisture-absorbent, so during rainy periods or rising groundwater levels, they can quickly deteriorate. Therefore, it’s recommended to remove the formwork after the concrete has set.
Don’t discard the leftover planks from softwood trees. They have only positive characteristics: after absorbing water fully, they become much stronger and retain their flexibility.
Tip! If there’s significant soil deformation, such as if your house is on a slope or a hill, softwood formwork acts as a buffer.
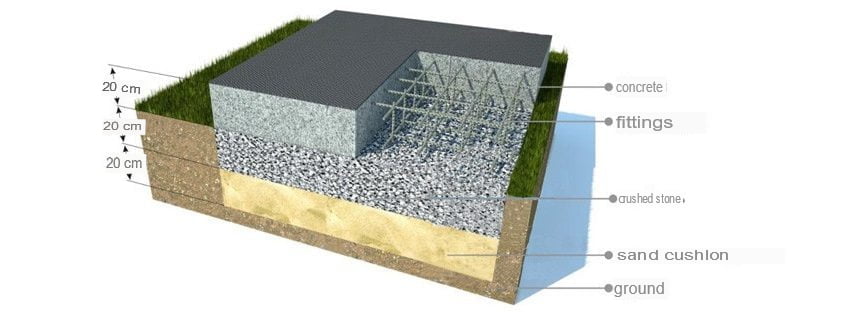
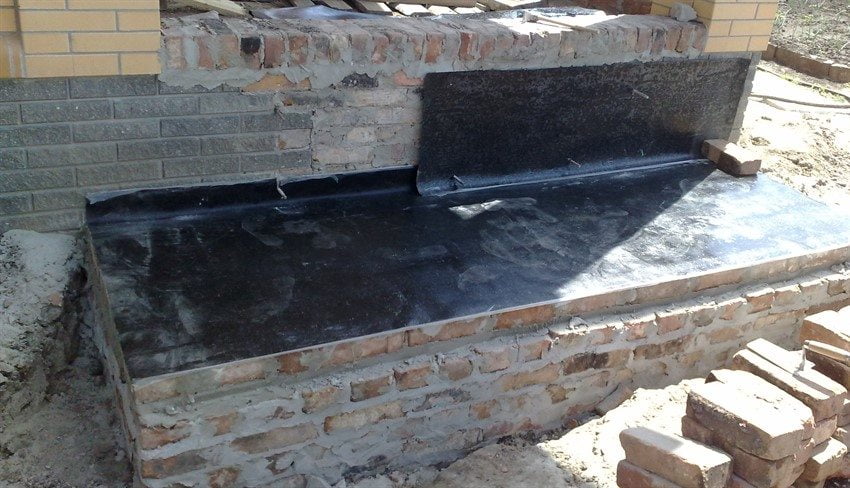
The most crucial and essential element when constructing a porch foundation by yourself is waterproofing. To establish it, you need to lay roofing felt at the bottom of the pit and then cover the entire inside surface of the formwork with it. Reinforcement is done using high-quality bricks, onto which you should place a mesh and secure it with pre-prepared pieces of rebar.
Following this principle, the pit is filled in multiple layers, including bricks with the mesh, and then the entire structure is filled with concrete. To avoid the formation of voids, you should tamp down each poured layer thoroughly with a shovel.
Tip! To compact the concrete effectively, it’s better to purchase an electric compactor. If you don’t have one, consider renting it.
Since concrete takes about a week to dry, you need to level the foundation surface immediately and cover it with roofing felt, overlapping it by about 50-60 cm on each side. You can also use standard construction film. These measures will protect the surface layer from rain since excessive water can make it quite fragile in the future, potentially damaging your foundation.
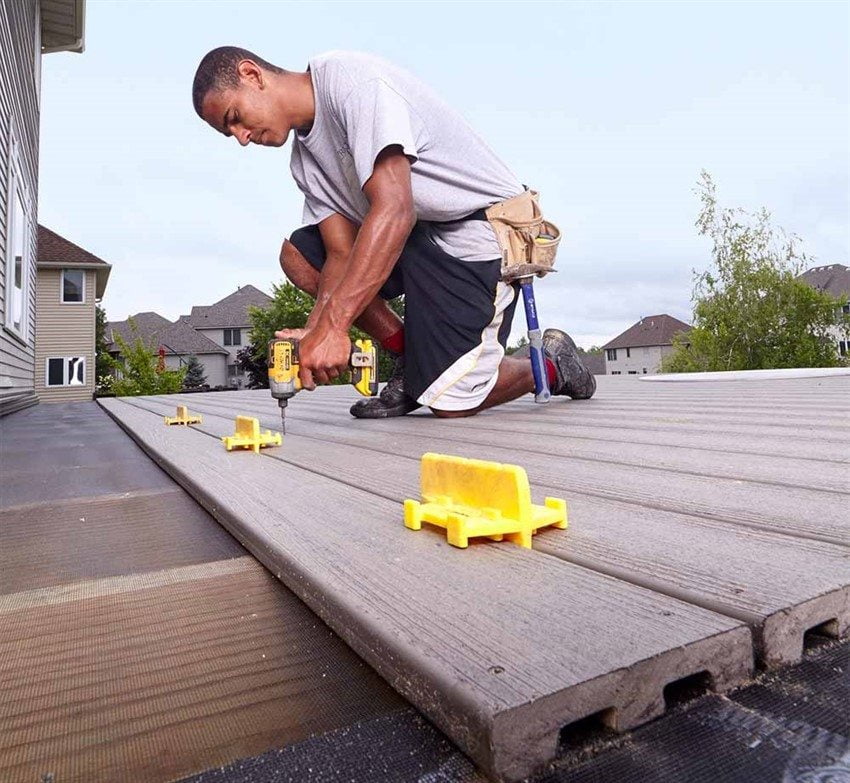
If necessary, you can trim the top of the finished beam, ensuring that the posts are at the same level. However, try to calculate the height of the supports with consideration for the entrance door, so the height difference should be about 5 cm. The joists are attached using screws or anchors, depending on your wall material.
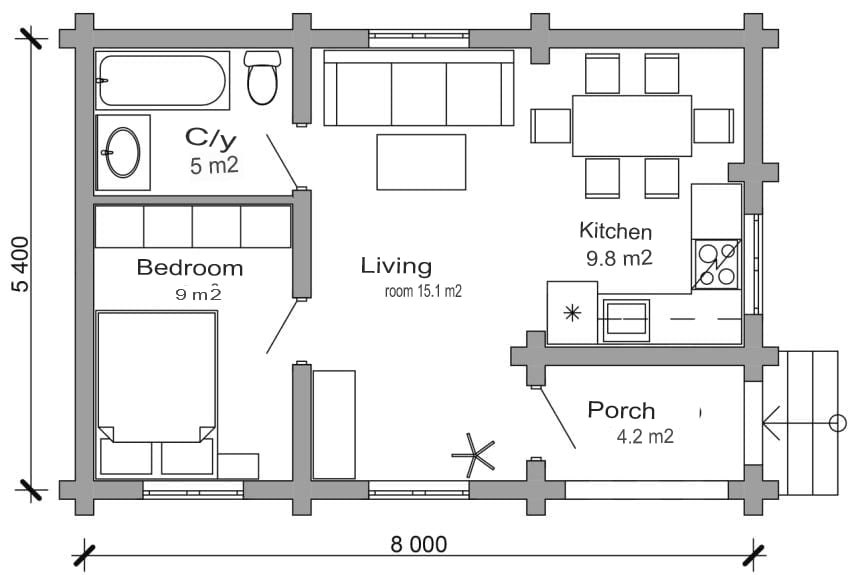
Porch to the House with Your Own Hands. Projects. Photos
Often, traditional materials are used for construction:
- Wood;
- White and red brick;
- Decorative stone;
- Metal;
- High-quality concrete.
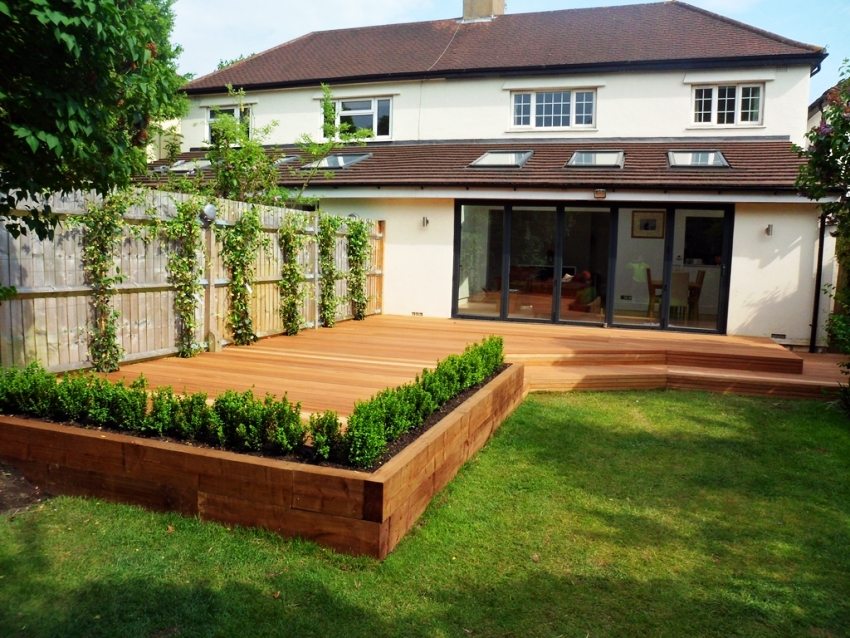
Building a Wooden Porch by Yourself
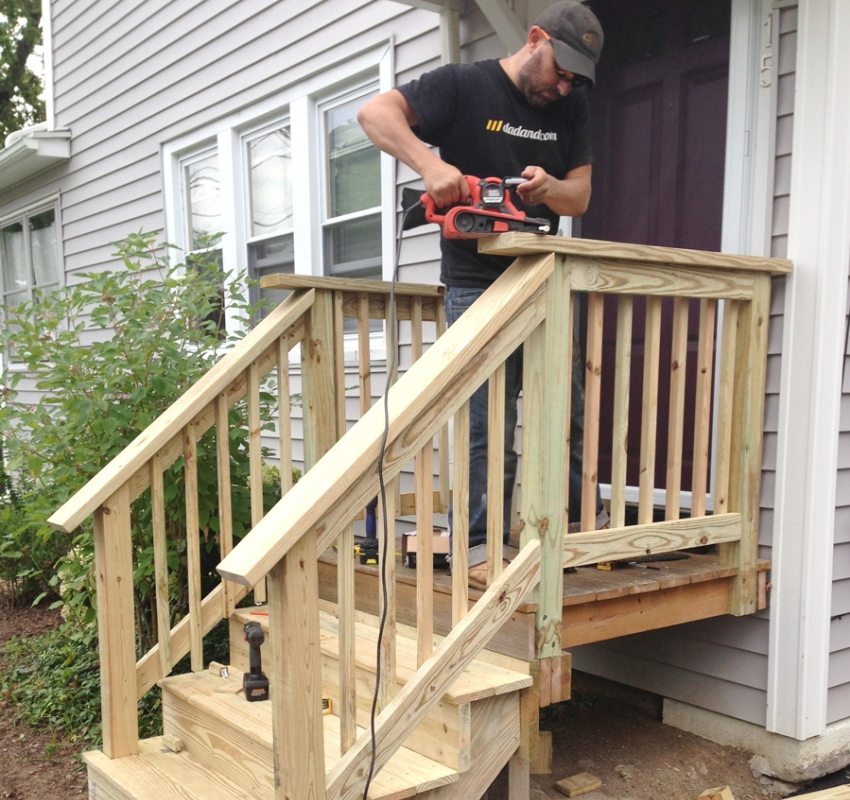
How to build a wooden porch by yourself? Nowadays, wood is the most common material for construction. This is because wood is relatively easy to work with, making it quite straightforward and quick to build a porch on your own. All you need is a circular saw (it can be a basic one, but it must have fine teeth for precision), a specialized builder’s square, and skilled hands.
Traditionally, hardwoods like oak have been considered ideal materials for this purpose, followed by pine and other softwoods. Each of them is very strong and easy to work with. Interestingly, after proper treatment, materials made from these woods are nearly as durable as oak or other, much harder woods.
It’s important to remember! Working with hardwood requires skill, the right tools, and, most importantly, specific knowledge in this field. For instance, determining the quality of oak material after drying can be done only by an experienced carpenter.
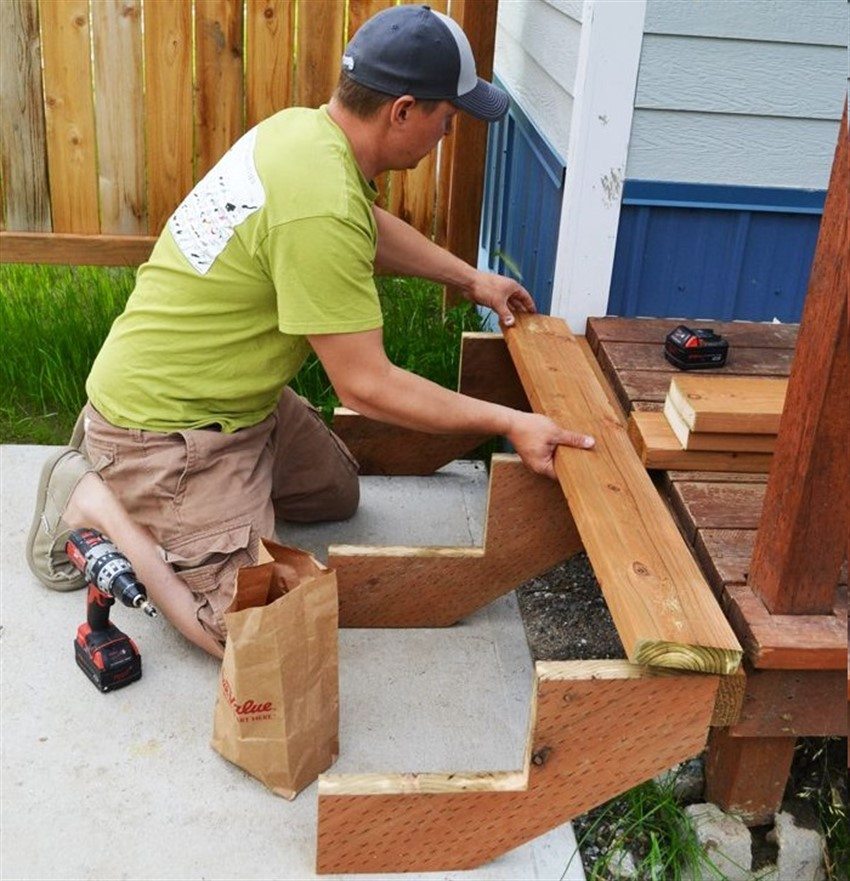
First and foremost, you’ll need to create stringers. Since it’s not practical to make a porch for a wooden house narrower than 120 cm, you’ll need at least three stringers. Ideally, the distance between them should be about half a meter, which will make your porch construction much easier.
This approach will help ensure the strength and, most importantly, the durability of the self-made structure, regardless of how often the stairs will be used and the weight they will bear.
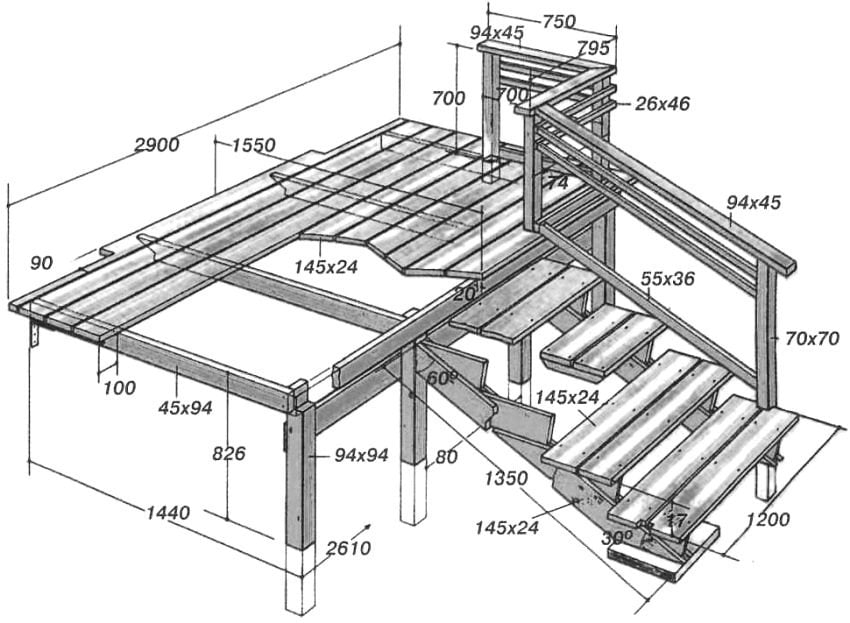
Keep in mind! A stringer is a load-bearing beam with notches, and it plays a crucial role in the support structure. Stairs should ideally be placed only on the horizontal edges of these notches.
The stringer (also known as the inclined beam) must be several times thicker than the stringer itself. They are connected using crossbeams. In the end, the necessary number of stringers is attached between them.
You will definitely need a square to cut notches and make even steps. Even a gap of 5-6 mm between the notches can quickly cause one side of the steps to sag and the other to swell. Sharp temperature changes will significantly exacerbate the difference in step levels.
The width of the steps is usually made to accommodate an adult’s foot size, which is about 40 cm. The height between each step (riser) should not exceed 20 cm.
Remember that the number of steps must be odd, and for this, you need to provide one additional stringer. If you have four or more steps, you’ll need to install railings for the porch.
For an enclosed porch with well-covered stairs, you can do without overhanging steps. However, if the stairs are outside, an overhang is essential because it will direct water to the lower step, preventing it from accumulating in the risers.
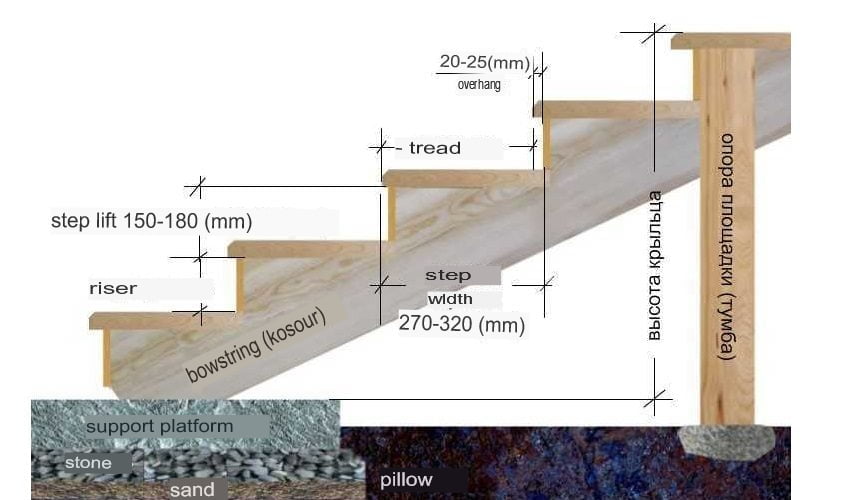
Tip! When installing a completed staircase, it should be set up with a slight slope (about 1-2 cm). This will help water flow downward instead of accumulating and forming ice.
The structure is installed directly on a pre-prepared platform, which serves as the foundation. To make your porch as sturdy as possible, you should place the stairs where the lower beam with stringers was previously embedded in the foundation. You can also use it to push down a small depression if the concrete hasn’t completely set. This way, you will create a sufficiently strong support.
For the flooring on the upper platform, you can use the same material that was used for the staircase. In this case, there’s only one requirement: it’s recommended to use the widest and longest boards available, making the joints as precise as possible. When the boards are tightly fitted together, you don’t need to worry about deformation, even if the wood may start to deteriorate over time.
It will take approximately 3 to 7 days of work to construct a wooden porch by yourself. The timeframe depends on the size of your platform, the staircase, and, of course, your woodworking skills. However, even a novice can accomplish this with the right guidance. The key is to break down the work into stages and follow the recommendations and instructions.
Metal Porch
How to make a metal porch? A metal porch has a significant advantage – it can be assembled in just a few hours if you’re skilled in using welding equipment. Additionally, a metal structure is much more cost-effective if you avoid purchasing forged elements. However, there are downsides: a DIY metal porch won’t be as aesthetically pleasing or unique as other options. If you want a beautiful porch made by yourself, you can buy forged components, but you’ll need to wait for them, typically around 4 weeks, depending on your order’s volume.

Don’t be discouraged if you have a limited budget because even a basic metal staircase can be made impressive and beautiful with some creativity and effort. For the simplest version, you can use channels, angles, and filling materials such as ceramic granite, wood, or wood-chipboard panels.
For a typical metal porch, you’ll need two channels of equal length. Attach them parallel to each other at the same distance as the size of the steps. Then, mark the angles and cut them to the same length as the steps, leaving a few extra centimeters on each side for welding seams.
Using the same method, cut small pieces from the angles and weld them together in the shape of a “G” (ensure the edge-frame is facing outward). The number of these pieces should equal the number of steps on your porch. Next, weld them closely to the channels, creating a quality metal zigzag. Repeat this process with the second channel.
After completing these steps, pair up the elements on the side where the angles were cut to match the width of the future staircase. This will create the contour of the steps, and the angle iron beneath the riser should be turned upwards to form a rim.
Your staircase is almost ready. Now it’s all about your taste. The most visually pleasing option is to attach wooden steps to the resulting frame using any suitable method. Even if you don’t have extensive welding experience, assembling such a porch by yourself should take around 2-3 hours in total.
Concrete Porch
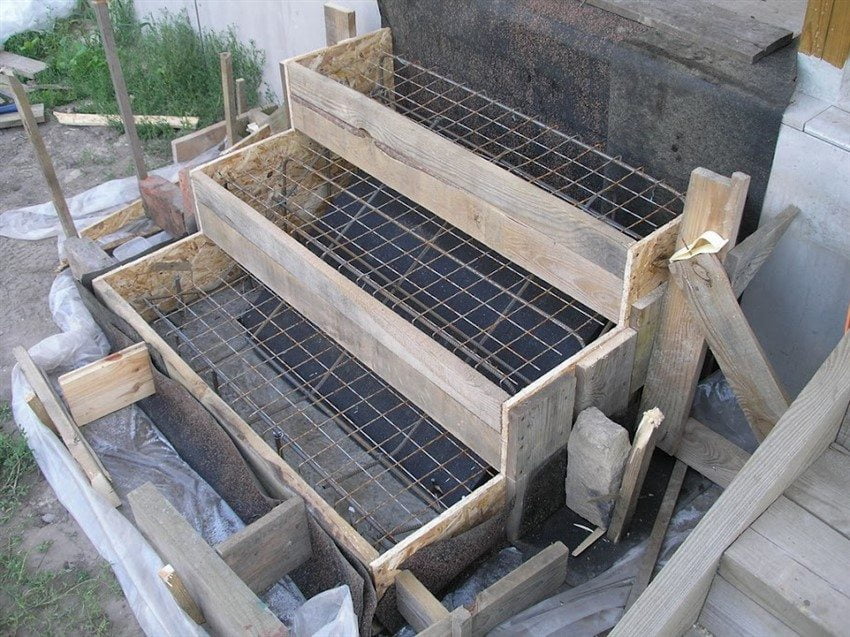
How to make a concrete porch? This option is considered an extension of the existing foundation, but with the reinforcement of all steps. This is done to prevent chips from forming due to constant heavy loads a couple of months later. Because concrete porches are typically covered with special decorative tiles, deteriorating concrete can quickly lead to chipping and cracks in the cladding.
On a pre-prepared foundation, you can assemble formwork, which will become the bottom step. Keep in mind that the height of this step should be 2 cm higher than the others due to the weight load. Then, a similar procedure is carried out as when constructing a reinforced foundation for the porch. The only difference is that in this case, there’s no need to skimp on reinforcement.
Tip! It’s recommended to fill the gap that forms between the two foundations with mineral wool. This method creates a good expansion joint.
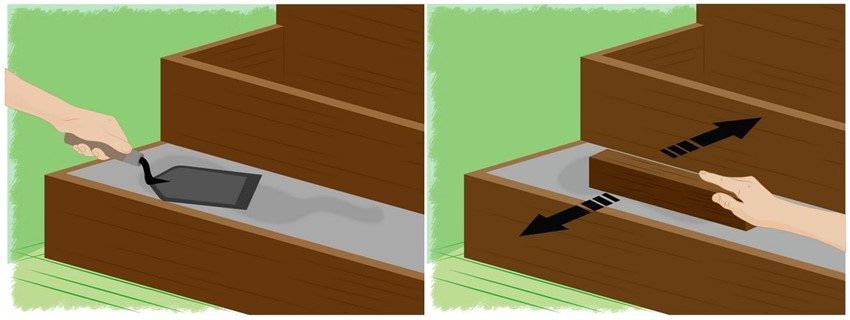
You can prepare the formwork for the steps in advance, which can save you time. However, it’s much more reliable and easier to pour concrete for each step one by one, and even better if the previous step’s mortar has a chance to set before pouring the next one.
Towards the end, you need to level the fully set structure and then cover it with any tiles suitable for a metal porch or stone cladding.

The time spent on the job depends on whether you use complete formwork and whether you form each step individually or all at once. On average, it will take about a week if you pour all at once, or a week per step for full concrete curing.
Brick or Stone Porch
How to make a brick or stone porch? This is perhaps the most challenging option for a porch. This is because it’s much easier to work with a brick foundation where precision isn’t as critical, compared to laying stone as evenly as possible.

Brick should only be used if you have several assistants who will help with the concrete work throughout. Working with stone is much more challenging because chipped edges cannot be perfectly matched. In general, if you have no experience in this activity and at least two people to assist, you should avoid this type of porch altogether; otherwise, you’ll waste your time and materials.

It will be much easier to create a concrete staircase and then select material for the steps that matches the size. After that, place them in a single layer on the concrete “frame,” which has been leveled in advance. This method has a significant advantage because if a mistake is made, you can easily chip off the cladding in the desired area and redo the finish.
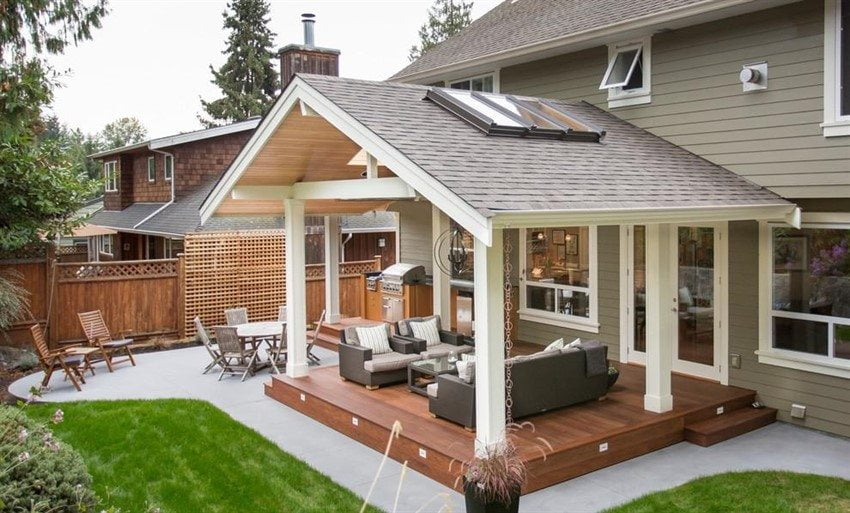
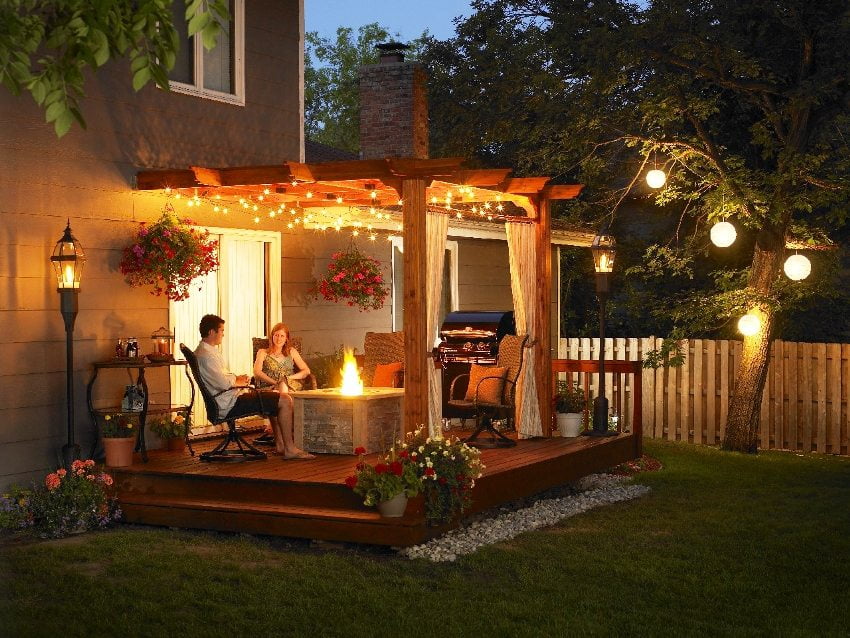
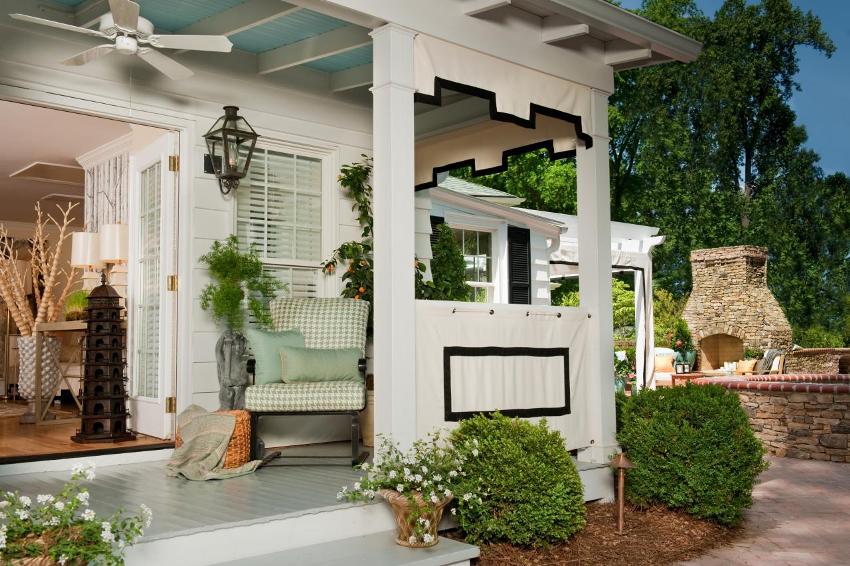
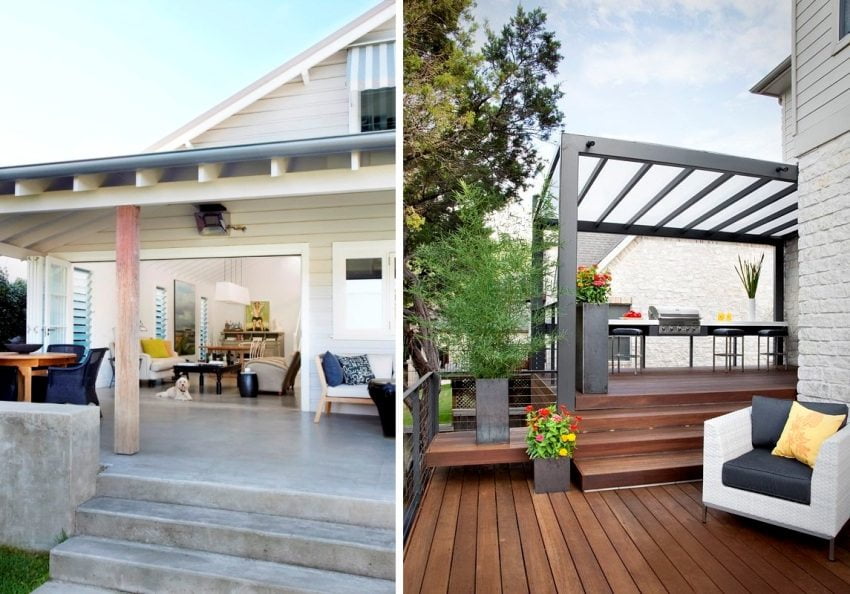
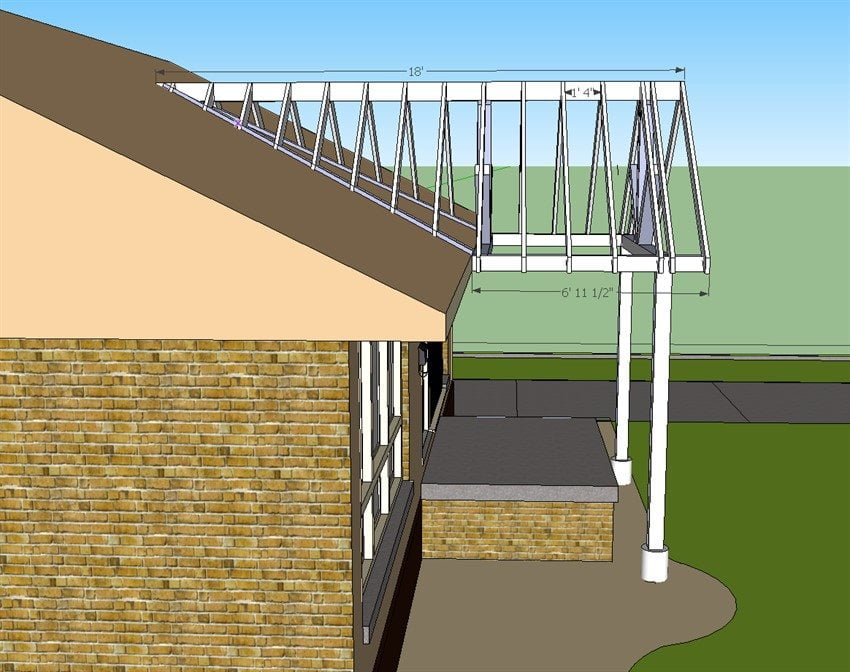
Building a Canopy
A canopy is primarily meant to protect the platform and steps from various natural elements. It also provides an opportunity to enhance the appearance of your DIY porch at home or on your property quickly. Canopies are often made from sturdy metal pipes, with coniferous trees or, as a last resort, metal used for the frame. For cladding, any type of wood or acrylic glass can be used.
Canopies made from wood will require repainting at least twice a year or treatment with special products; otherwise, they will gradually deteriorate and eventually split longitudinally. When using acrylic glass, it’s better to create gaps between the sheets, approximately 0.7 square meters each. Using regular glass is strongly discouraged as it can easily crack in the winter due to snow or due to frame deformation.

The total area of the canopy should be at least half a meter larger than the porch itself; otherwise, it won’t be able to fulfill its main function – protection.
The simplest and quite fast option is to create something similar to a metal staircase. In this case, you can make the distance between each step approximately 0.5 meters. In such a scenario, you won’t need G-shaped elements or beams because the load on the canopy will be significantly lower, and only corner supports in the external frame will be sufficient. The cladding with wood or ceramic granite can be easily replaced with any other material.
When pouring the foundation, during the formation of the base, it’s essential to install piles; it is on them that you should place the canopy. This will also allow you to fully glaze the veranda in just a couple of days if desired.
For the covering, it’s better to use a metal sheet with roofing shingles, but it will be much more impressive and beautiful if you use acrylic glass or polycarbonate.
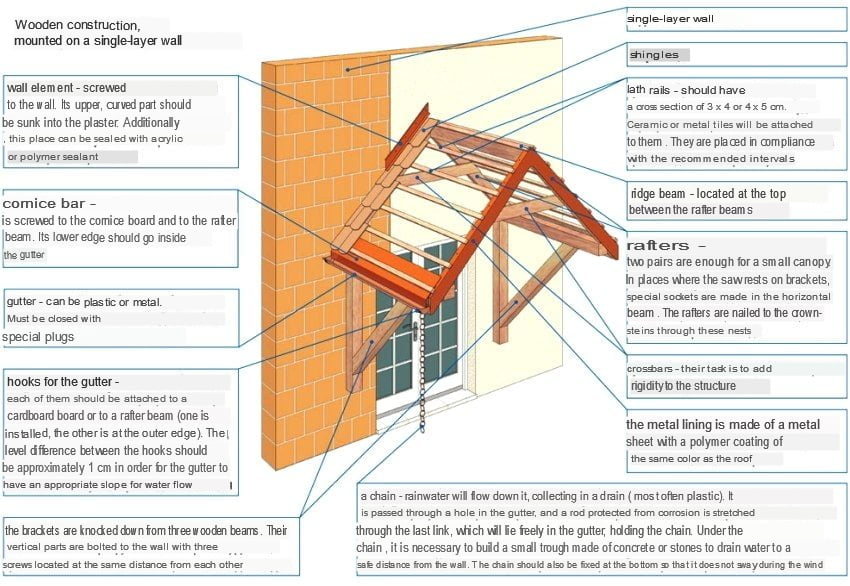
Tip! To prevent rust from forming on the worn metal sheet, you can easily paint it with several coats of paint.
Make the canopy sloped, and in the place where the lower edge will be, carefully weld a metal gutter with a slight slope. Attach an ordinary chain at the very end, which will reach the ground, and in this way, water during rain won’t splash around. Thanks to the excellent viscosity and easy flow of water, it will slowly flow down this chain. If you want to eliminate puddles near the porch, install drainage.
How to Glaze a Porch on Your Own
The most common option is a closed porch. In this case, a concrete or stone foundation with a canopy and stairs is widely popular, always securely attached to piles.
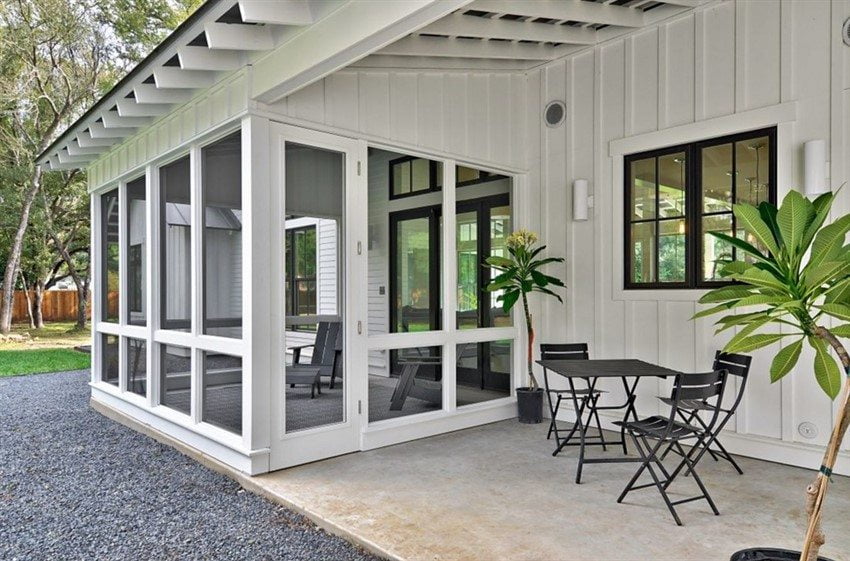
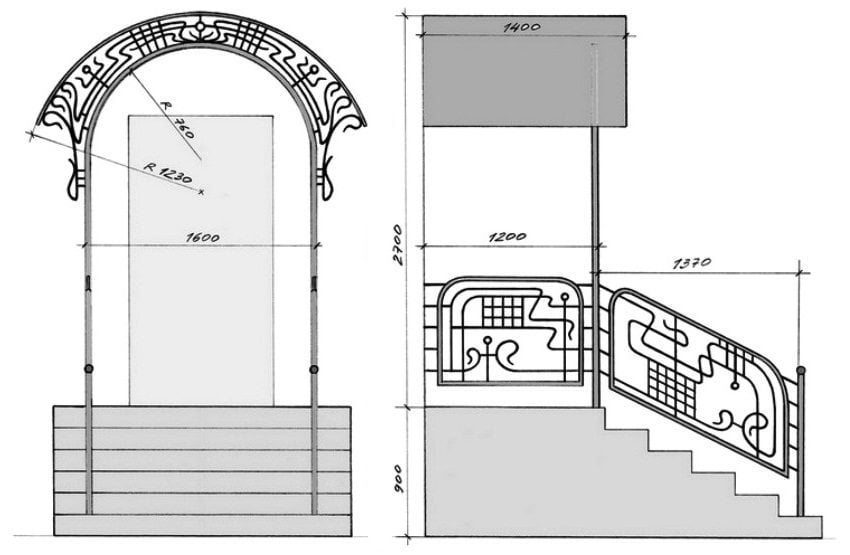
Using brackets that match the height of the piles in the canopy, a frame is formed. They are securely welded to the piles, and then double wooden frames with glass are inserted.
Tip! The glass sheet can be of any height, but its width should not exceed 120 cm because this type of glass is prone to sail and even a light wind can cause significant damage to it.
If the space between the piles is more than one meter, divide them with pseudo-piles. To do this, weld an angle inward at the top and bottom of each pile, and then place a double angle between them to form a pseudo-pile. Similarly, divide the height to create a horizontal beam from several double angles. This significantly reduces the load on the glass, and the structure itself will appear light and elegant.

Common Mistakes to Avoid During Porch Construction
Building a porch on your own using low-quality concrete (below grade 200). This type of concrete is quite porous, making it difficult to finish because other mixtures have much higher strength after complete drying. In this case, temperature changes can seriously damage the finish. The foundation itself, which will be exposed, will start to deteriorate in the summer, and the brick steps will deteriorate even faster.
Lack of proper waterproofing. Failing to waterproof the porch in time will lead to a significant accumulation of moisture at the bottom, causing gradual deterioration during freezing. The steps will suffer the most, as they are the first to soak.
Delaying the leveling of steps and plastering until several days after pouring concrete. If there is a long time gap, all layers will not hold together without additional coatings in the structure, or at best, they will hold together very weakly. Remember that the point where plastering meets the screeds is the most vulnerable.
Building the foundation without reinforcement at its base. If you lack reinforcement, the porch will simply split into two separate parts with the slightest settlement. Such a repair will be impossible.
Attaching the porch to the house foundation without special expansion joints. It’s only possible to securely attach the porch if it shares a foundation with the house. If not, a settlement crack will appear right on the boundary of the two foundations. To avoid this, place the decorative brick or tile joint on one boundary and fill the gaps with silicone sealant, avoiding grout.
So, you don’t need any specific construction skills to build a porch on your own. Each operation is considered basic in construction, and therefore, even a beginner with skilled hands can handle it.